SPRING MVC - CHECKBOXES EXAMPLE 자바 스프링 mvc 체크박스 예제
2018.03.07 20:47
SPRING MVC - CHECKBOXES EXAMPLE 자바 스프링 mvc 체크박스 예제
SPRING MVC - CHECKBOXES EXAMPLE
https://www.tutorialspoint.com/springmvc/springmvc_checkboxes.htm
The following example explains how to use Multiple Checkboxes in forms using the Spring Web MVC framework. To start with, let us have a working Eclipse IDE in place and stick to the following steps to develop a Dynamic Form based Web Application using the Spring Web Framework.
| Step | Description |
|---|---|
| 1 | Create a project with a name HelloWeb under a package com.tutorialspoint as explained in the Spring MVC - Hello World chapter. |
| 2 | Create Java classes User, UserController under the com.tutorialspointpackage. |
| 3 | Create view files user.jsp, users.jsp under the jsp sub-folder. |
| 4 | The final step is to create the content of the source and configuration files and export the application as explained below. |
User.java
package com.tutorialspoint;

public class User {

   private String username;
   private String password;
   private String address;
   private boolean receivePaper;
   private String [] favoriteFrameworks;

   public String getUsername() {
      return username;
   }
   public void setUsername(String username) {
      this.username = username;
   }

   public String getPassword() {
      return password;
   }
   public void setPassword(String password) {
      this.password = password;
   }
   public String getAddress() {
      return address;
   }
   public void setAddress(String address) {
      this.address = address;
   }
   public boolean isReceivePaper() {
      return receivePaper;
   }
   public void setReceivePaper(boolean receivePaper) {
      this.receivePaper = receivePaper;
   }
   public String[] getFavoriteFrameworks() {
      return favoriteFrameworks;
   }
   public void setFavoriteFrameworks(String[] favoriteFrameworks) {
      this.favoriteFrameworks = favoriteFrameworks;
   }
}
UserController.java
package com.tutorialspoint;

import java.util.ArrayList;
import java.util.List;

import org.springframework.stereotype.Controller;
import org.springframework.web.bind.annotation.ModelAttribute;
import org.springframework.web.bind.annotation.RequestMapping;
import org.springframework.web.bind.annotation.RequestMethod;
import org.springframework.web.servlet.ModelAndView;
import org.springframework.ui.ModelMap;

@Controller
public class UserController {

   @RequestMapping(value = "/user", method = RequestMethod.GET)
   public ModelAndView user() {
      User user = new User();
	  user.setFavoriteFrameworks((new String []{"Spring MVC","Struts 2"}));
	  ModelAndView modelAndView = new ModelAndView("user", "command", user);
	  return modelAndView;
   }

   @RequestMapping(value = "/addUser", method = RequestMethod.POST)
   public String addUser(@ModelAttribute("SpringWeb")User user,
      ModelMap model) {
      model.addAttribute("username", user.getUsername());
      model.addAttribute("password", user.getPassword());
      model.addAttribute("address", user.getAddress());
      model.addAttribute("receivePaper", user.isReceivePaper());
	  model.addAttribute("favoriteFrameworks", user.getFavoriteFrameworks());
      return "users";
   }

   @ModelAttribute("webFrameworkList")
   public List<String> getWebFrameworkList() {
      List<String> webFrameworkList = new ArrayList<String>();
      webFrameworkList.add("Spring MVC");
      webFrameworkList.add("Struts 1");
      webFrameworkList.add("Struts 2");
      webFrameworkList.add("Apache Wicket");
      return webFrameworkList;
   }
}
Here, for the first service method user, we have passed a blank User object in the ModelAndView object with name "command", because the spring framework expects an object with name "command", if you are using <form:form> tags in your JSP file. So, when the user method is called, it returns the user.jsp view.
The second service method addUser will be called against a POST method on the HelloWeb/addUser URL. You will prepare your model object based on the submitted information. Finally, the "users" view will be returned from the service method, which will result in rendering the users.jsp
user.jsp
<%@taglib uri = "http://www.springframework.org/tags/form" prefix = "form"%>
<html>
   <head>
      <title>Spring MVC Form Handling</title>
   </head>
   <body>

      <h2>User Information</h2>
      <form:form method = "POST" action = "/HelloWeb/addUser">
         <table>
            <tr>
               <td><form:label path = "username">User Name</form:label></td>
               <td><form:input path = "username" /></td>
            </tr>
            <tr>
               <td><form:label path = "password">Age</form:label></td>
               <td><form:password path = "password" /></td>
            </tr>
            <tr>
               <td><form:label path = "address">Address</form:label></td>
               <td><form:textarea path = "address" rows = "5" cols = "30" /></td>
            </tr>
            <tr>
               <td><form:label path = "receivePaper">Subscribe Newsletter</form:label></td>
               <td><form:checkbox path = "receivePaper" /></td>
            </tr>
            <tr>
               <td><form:label path = "favoriteFrameworks">Favorite Web Frameworks</form:label></td>
               <td><form:checkboxes items = "${webFrameworkList}" path = "favoriteFrameworks" /></td>
            </tr>
            <tr>
               <td colspan = "2">
                  <input type = "submit" value = "Submit"/>
               </td>
            </tr>
         </table>
      </form:form>
   </body>
</html>
Here, we are using <form:checkboxes /> tag to render HTML checkboxes.
<form:checkboxes items = "${webFrameworkList}" path = "favoriteFrameworks" />
It will render following HTML content.
<span>
   <input id = "favoriteFrameworks1" name = "favoriteFrameworks" type = "checkbox" value = "Spring MVC" checked = "checked"/>
   <label for = "favoriteFrameworks1">Spring MVC</label>
</span>
<span>
   <input id = "favoriteFrameworks2" name = "favoriteFrameworks" type = "checkbox" value = "Struts 1"/>
   <label for = "favoriteFrameworks2">Struts 1</label>
</span>
<span>
   <input id = "favoriteFrameworks3" name = "favoriteFrameworks" type = "checkbox" value = "Struts 2" checked = "checked"/>
   <label for = "favoriteFrameworks3">Struts 2</label>
</span>
<span>
   <input id = "favoriteFrameworks4" name = "favoriteFrameworks" type = "checkbox" value = "Apache Wicket"/>
   <label for = "favoriteFrameworks4">Apache Wicket</label>
</span>
<input type = "hidden" name = "_favoriteFrameworks" value = "on"/>
users.jsp
<%@taglib uri = "http://www.springframework.org/tags/form" prefix = "form"%>
<html>
   <head>
      <title>Spring MVC Form Handling</title>
   </head>
   <body>

      <h2>Submitted User Information</h2>
      <table>
         <tr>
            <td>Username</td>
            <td>${username}</td>
         </tr>
         <tr>
            <td>Password</td>
            <td>${password}</td>
         </tr>
         <tr>
            <td>Address</td>
            <td>${address}</td>
         </tr>
         <tr>
            <td>Subscribed to Newsletter</td>
            <td>${receivePaper}</td>
         </tr>
         <tr>
            <td>Favorite Web Frameworks</td>
            <td> <% String[] favoriteFrameworks = (String[])request.getAttribute("favoriteFrameworks");
            for(String framework: favoriteFrameworks) {
               out.println(framework);
            }
            %></td>
         </tr>
      </table>
   </body>
</html>
Once you are done with creating source and configuration files, export your application. Right click on your application, use Export → WAR File option and save your HelloWeb.war file in Tomcat's webapps folder.
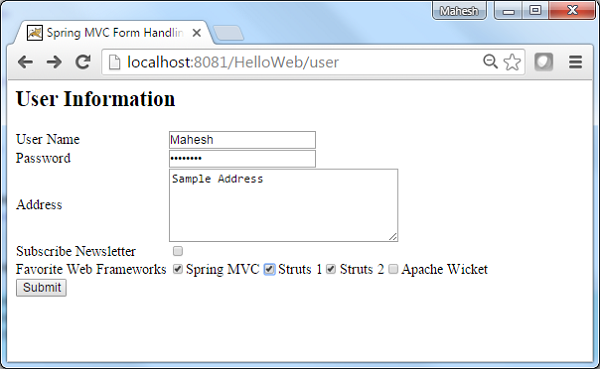
Now, start the Tomcat server and make sure you are able to access other webpages from webapps folder using a standard browser. Try a URL http://localhost:8080/HelloWeb/user and we will see the following screen if everything is fine with the Spring Web Application.

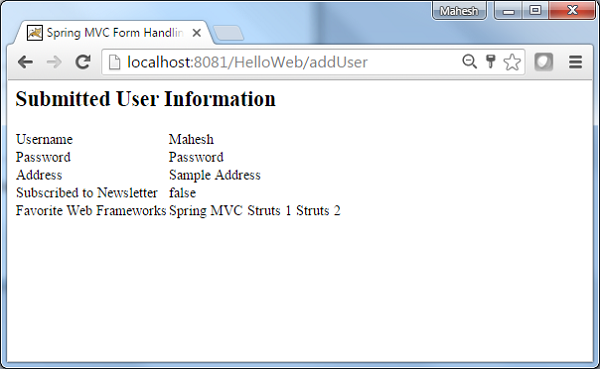
After submitting the required information, click on the submit button to submit the form. We will see the following screen, if everything is fine with your Spring Web Application.

[출처] https://www.tutorialspoint.com/springmvc/springmvc_checkboxes.htm
광고 클릭에서 발생하는 수익금은 모두 웹사이트 서버의 유지 및 관리, 그리고 기술 콘텐츠 향상을 위해 쓰여집니다.


