
Spring MVC Dropdown Box Example
2018.03.26 16:16
Spring MVC Dropdown Box Example
With this example we shall show you how to create a dropdown box using Spring MVC. Spring MVC provides us with tags similar to HTML tags in functionality. In order to make use of a dropdown box, in Spring MVC, we are going to use the tag. This tag renders a list of HTML tags and sets the attribute as appropriate based on the bound value, as will be explained below.
We are making use of a simple class, which is the MVC model. It has one String property, which and will be used for the dropdown box. We are also using a validator to check if there is any selection checked in the dropdown menu. Finally, we are using a simple view that contains a form with all tags required to create a dropdown box with selection menu.
You may skip project creation and jump directly to the beginning of the example below.
Our preferred development environment is Eclipse. We are using Eclipse Juno (4.2) version, along with Maven Integration plugin version 3.1.0. You can download Eclipse from here and Maven Plugin for Eclipse from here. The installation of Maven plugin for Eclipse is out of the scope of this tutorial and will not be discussed. We are also using JDK 7_u_21. Tomcat 7 is the application server used.
Let’s begin,
1. Create a new Maven project
Go to File -> Project ->Maven -> Maven Project.
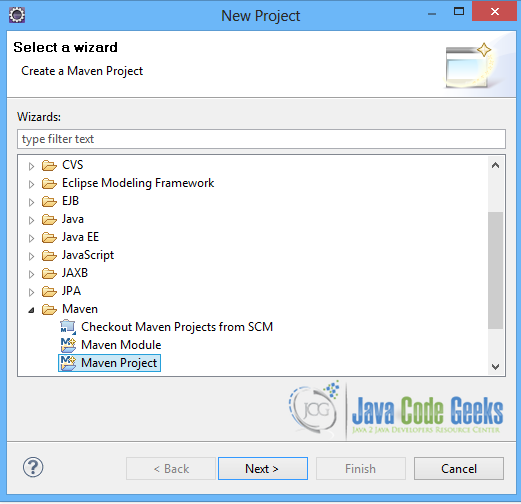
New Maven Project – step 1
In the “Select project name and location” page of the wizard, make sure that “Create a simple project (skip archetype selection)” option is unchecked, hit “Next” to continue with default values.
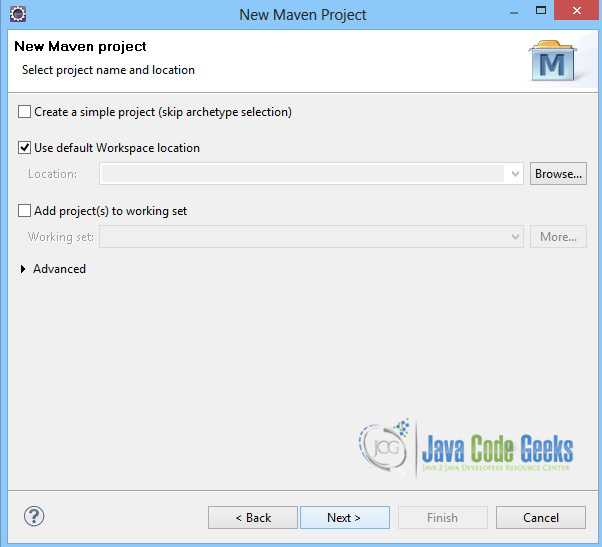
New Maven project- step 2
Here the maven archetype for creating a web application must be added. Click on “Add Archetype” and add the archetype. Set the “Archetype Group Id” variable to , the “Archetype artifact Id” variable to and the “Archetype Version” to . Click on “OK” to continue.
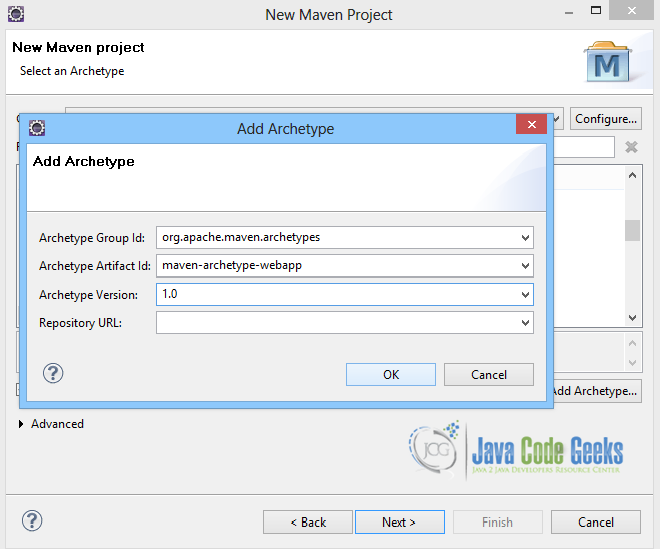
Add Maven archetype
In the “Enter an artifact id” page of the wizard, you can define the name and main package of your project. Set the “Group Id” variable to and the “Artifact Id” variable to . The aforementioned selections compose the main project package as and the project name as . Set the “Package” variable to , so that a war file will be created to be deployed to tomcat server. Hit “Finish” to exit the wizard and to create your project.
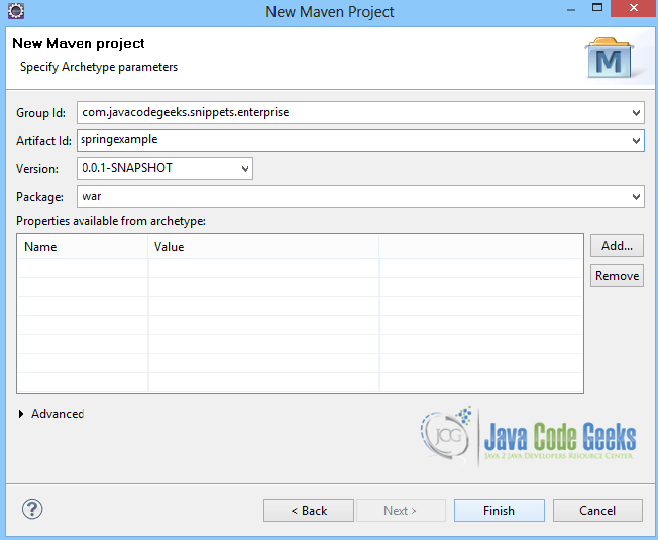
Configure Maven project
The Maven project structure is shown below:
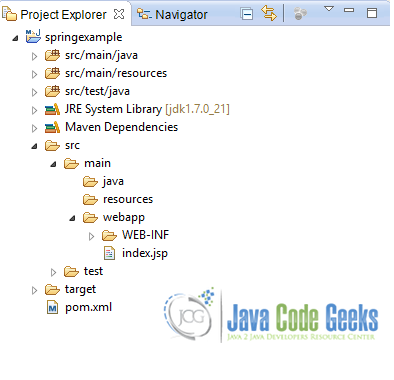
New project structure
- It consists of the following folders:
- /src/main/java folder, that contains source files for the dynamic content of the application,
- /src/test/java folder contains all source files for unit tests,
- /src/main/resources folder contains configurations files,
- /target folder contains the compiled and packaged deliverables,
- /src/main/resources/webapp/WEB-INF folder contains the deployment descriptors for the Web application ,
- the pom.xml is the project object model (POM) file. The single file that contains all project related configuration.
2. Add Spring-MVC dependencies
Add the dependencies in Maven’s file, by editing it at the “Pom.xml” page of the POM editor. The dependency needed for MVC is the package. The and the packages will be also used here for validation.
pom.xml
3. Create the model
The class is the class created to be used as the Model. It has a String property, which is the . This field will be used for the dropdown box. It has getter and setter methods, so that its value is rendered by the view.
Colour.java
4. Create a Validator
The validator class that is created below is the class. It is used to help us check if there is a selected value in the dropdown box. It implements the , and overrides the two methods it provides.
The method is used to check if the validator can validate instances of the .
In the method, an instance of the class is provided, and an object. The is used here, since it offers validation API methods to check the fields of the object. So in this method we can check if the field is empty. The error message is passed in the object. A file with the error message is used here to pass the validation message to the object as shown below:
ColourValidator.java
The file below is the file that contains the error message for the field of class.
validation.properties
5. Create the Controller
The is where the will delegate requests. The annotation indicates that the class serves the role of a Controller. The annotation is used to map a URL to either an entire class or a particular handler method.
A is injected here, via the annotation, also making use of the annotation to specify that the implementation of the class is injected.
The annotation in method allows us to configure web data binding directly within the controller. With we can initialize the , that is used for data binding from web request parameters to JavaBean objects. Here, the is where the validator is set.


The Controller consists of two basic methods, a GET method, which is and a POST method, which is . The first method creates and returns to the view a new instance of the class.
The second method also gets the , and the object created, which now consists of the values passed in the form. is annotated with the annotation, which allows the object to be validated with the validator. is where all validation errors are automatically passed, so it can be used to decide the next navigation step. If there are no errors, the validation is successful, so the method returns the String representation of the page, and the object is passed at the . Otherwise, the returned String is the String representation of the page, which also has the error messages, as will be shown below.
Take a look at the method. It is used to initialize the list that is passed to the model for the tag. So every time the form is rendered the list of is not null. If the list is not initialized, then the iteration over the items of the list leads to a NullPointerException.
ColourController.java
6. Create the view with the dropdown box
The view below is a simple example of how to create a form with a dropdown box. It is a simple html view consisting of the and html tags. In order to create a form in Spring MVC, we make use of the tag. Its property is set to POST, and the property is set to the name of the backing bean that is binded to the Model, which is the class.
In order to create dropdown box, we are using the tag, and inside this tag we are using the and tags. The tag has a property, which is set to the bean’s property binded to it. The tag holds the initial value of the dropdown box, and has a property and a property, where the initial label and value of the box are set. We chose that the initial value is set to an empty String. The tag has an property, where the list created in the controller is set. This list is iterated and its values are shown in the dropdown box.
The tag defines where the error message of the specified field will be displayed in the view. Finally, the tag, with property set to is used for the submit button.
colour.jsp
This page will be rendered when the submit button is pressed and the validation succeeds:
successColour.jsp
7. Configure the application
The files that we must configure in the application are the file and the file.
The file is the file that defines everything about the application that a server needs to know. It is placed in the directory of the application. The element declares the . When the is initialized, the framework will try to load the application context from a file named located in directory. So, we have created the file, that will be explained below. The element of file specifies what URLs will be handled by the .
web.xml
The file is also placed in directory. The bean is used as internal resource views resolver, meaning that it will find the and files in the folder. We can also set properties such as or to the view name to generate the final view page URL. This is the file where all beans created, such as Controllers are placed and defined.
The tag is used, so that the Spring container will search for all annotated classes under the package. The tag is used, so that the container searches for annotated classes, to resolve MVC. The class is also defined here as a bean, with an id.
Finally, the is used, to provide access to resource bundles using specified basenames. Its property is set to , thus pointing to the properties file that holds the validation messages.
mvc-dispatcher-servlet.xml
8. Run the application
Now, let’s run the application. We first build the project with Maven. All we have to do is right click on the project and select -> Run As: Maven build. The goal must be set to package. The file produced must be placed in folder of tomcat. Then, we can start the server.
Hit on:
The page rendered is the one below:
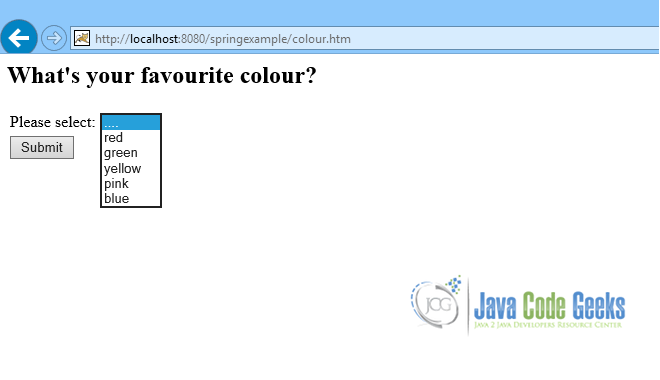
Dropdown box
Click on the Submit button. The result is the one below:
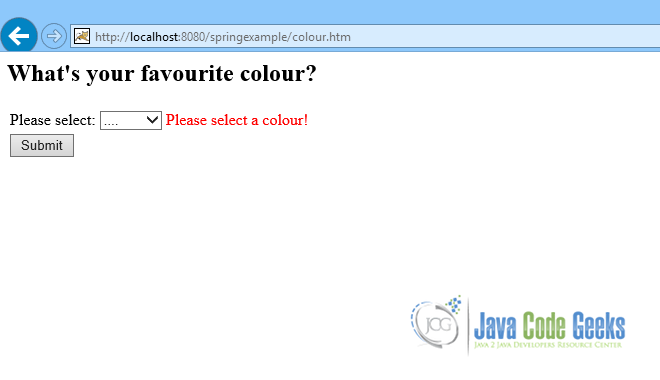
dropdown box error
The validation message is displayed, since no colour is selected.
Now, choose a colour and click on Submit again:
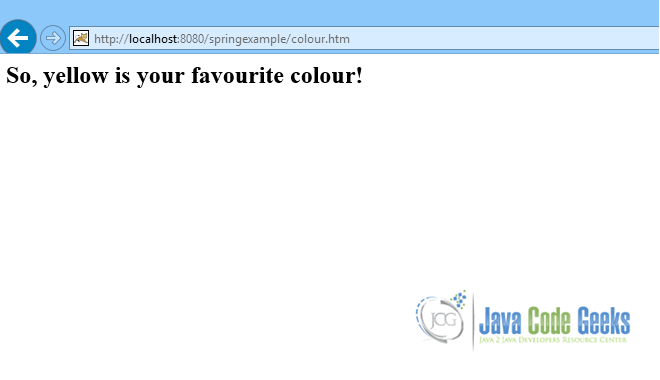
dropdown box correct
Now the validation is correct and the page is rendered.
This was an example of how to use a dropdown box in a Spring MVC form.
Download the eclipse project of this tutorial: SpringMVCDropdownBox
[출처] https://examples.javacodegeeks.com/enterprise-java/spring/mvc/spring-mvc-dropdown-box-example/
광고 클릭에서 발생하는 수익금은 모두 웹사이트 서버의 유지 및 관리, 그리고 기술 콘텐츠 향상을 위해 쓰여집니다.
