암호화폐 (비트코인, cryptocurrency, bitcoin) Solidity 이더리움 Solidity Tutorial: How to build and deploy a smart contract to send Ether from one account to another

Solidity Tutorial: How to build and deploy a smart contract to send Ether from one account to another

Before we jump right in, I wrote an in-depth tutorial on how to deploy a smart contract to Rinkeby testnet, you can go read it up.

So let's goooo!!

Below are the table of contents.

Intro

What tools do we need?

Writing a smart contract.

Compiling and deploying to the JavaScript VM.

Testing the smart contract.

Intro

Oi, so here we going to be building a smart contract that can be able to send funds(ether) from one Ethereum account/address to another. Also, we will be adding a feature that allows only the owner(deployer) of the contract to be able to send these funds(ether).

What tools do we need?

The tools we will be needing for this tutorial is nothing other than the remix Ethereum web IDE for quick and rapid development and deployment of smart contracts written in Solidity.

You don't need to know anything about solidity or smart contracts in order to follow up with this tutorial as this is beginner friendly, and I try my best to explain every line of code as I write them.

Writing a smart contract

In order to get started, you have to jump over to this website known as Remix Ethereum. The below is a screenshot of the interface of a website you might get some annoying pop-ups so just hit the decline or accept button to get in.

Image description

  • Once we are here, head over to the left sidebar and locate the file icon. Click on it and it should pull up a makeshift file manager.
  • Locate the contract folder and click on it.
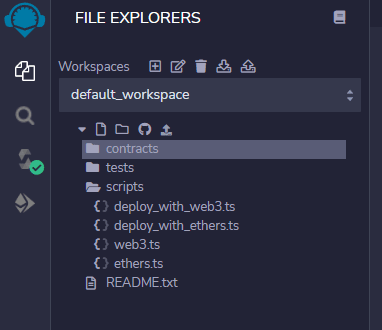
Image description

Just right above the contract folder you should see a file icon at the very top just beside the folder icon.

  • Click on it and it should generate a fresh file which you can name anything. But in this case, I'm going to name it sendEther.sol

Great, now let's get started with the good stuff.

Write the below on the first line of your solidity file.

// SPDX-License-Identifier: MIT

This tells the Solidity compiler that we are using the MIT license for this program.
SPDX means "Software Package Data Exchange" an open standard for software bill of materials.
SPDX allows the expression of components, licenses, copyrights, security references and other metadata relating to software.
You can read more about this here.

Next, let's define the version of Solidity we are going to use by writing the below.

pragma solidity ^0.8.11;

This tells the compiler that we are going to be using the 0.8.11 and above version of Solidity.
Ps: Solidity is a strongly typed compiled language so the semi colons are necessary.

Let's write a smart contract by using the Contract keyword like below.

contract SendEth{}

This is kind of the entry point where you can start writing out the functionalities, related state variables and logic of your contract. It's kind of conventional to capitalize the contract identifier. It can be any name you want, doesn't matter.

This smart contract is going to be needing two state variables named amount (for holding the amount to be sent) and the owner address.

Write the below inside your already defined contract body.

uint public amount;
address payable owner;

Solidity just like other languages have datatypes and uint is one of them. It actually means unsigned integer (no negatives say -20,nah we don't do that here)

Some other Solidity datatypes include bool, struct, mapping, string, address…

address payable owner;

Since we are sending ether from our Ethereum address we need to add the "payable" keyword right before our identifier.

Now, let's write the constructor just below our state variables.

constructor () {
     owner = payable(msg.sender); // set the deployer of contract as the owner
   }

The constructor allows us to define some logic to be set during the deployment of our smart contract. Let's say for example you want instantiate say a name variable during deployment, you do that in the constructor.

owner = payable(msg.sender);

Here, we are calling the owner address that we declared as a state variable and assigning it to msg.sender. Then we cast the msg.sender as a payable address.
msg.sender is kind of a global variable that you get access to in your contract and in this case, it holds the payable (can receive ether) address of the person who deployed the contract.

This might be confusing tho, I will clear the air once we get to the deployment stage so you can see it for yourself.

Your file right now should contain the below.

// SPDX-License-Identifier: MIT

pragma solidity ^0.8.11;

contract SendEth {
   uint public amount;
   address payable owner;
   constructor (){
     owner = payable(msg.sender); // set the deployer of contract as the owner
   }
}

Next, let's write a function to enable us send Ether to any address.

function sendEth(address payable receiver) payable public{
     }

Here we are declaring a function with name of sendEth **and a parameter of a **payable address. Any address sent in to this function should be able to receive funds (payable).
Also, since the function allows one to be able to send ether to another account we need to add the payable keyword to it.
The *public * keyword ensures that this function is able to seen and be called anywhere within the smart contract.

Now, add the below statement into the function body.

require(owner == msg.sender, "Only the owner can send funds");
amount = msg.value;
receiver.transfer(amount);

The first line ensures that only the owner of the contract who deployed it can be able to call this function. That means an outsider with a different Ethereum address can't send funds by calling this function.

amount = msg.value;

Here, we are setting the value the owner of the contract sent to the variable amount.

msg.value is another global variable that is available to you.

receiver.transfer(amount);

Then we send the ether to the address passed into the function as an argument using the transfer() function.

And that's it!! Your whole code should be like this below.


// SPDX-License-Identifier: MIT

pragma solidity ^0.8.11;

contract Sender {
   uint public amount;
   address payable owner;

   constructor (){
     owner = payable(msg.sender); // set the deployer of contract as the owner
   }
   function sendEth(address payable receiver) payable public{
     require(owner == msg.sender, "Only the owner can send funds");
     amount = msg.value;
     receiver.transfer(amount);
}
}

Now, it's time to deploy.
Go to the left of your sidebar and click on the solidity icon.
You should see the below.
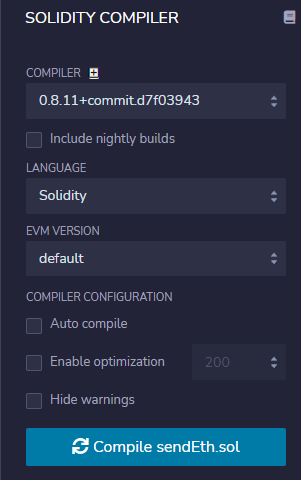
Image description

If the compiler version is not on the version you wrote your contract in, you can change it here by switching to your preferred compiler.

  • Also, check the auto compile button so it auto compiles your code.
  • Click the "compile" button to compile it.

Deploying.

Cool, now we are going to deploy the contract on the JavaScript VM. This is a makeshift in-memory blockchain that remix avails us with.

  • Click the icon below the compile one and you should get the screen below.
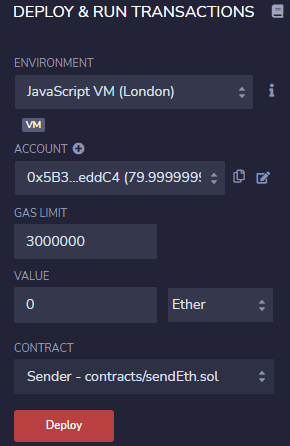
Image description

Once here there are couple of things to do:

  • Leave the environment as JavaScript VM.
  • Select the eth account that you want to deploy the contract with. The first eth account is good enough.
  • Leave the gas fees and stuff as is.(Submit to the process)

Finally, click on the red deploy button.
If you see this green light in the console, then it was successful.

Image description

Phew!! You can beat your chest right now and change your Twitter bio to "Smart Contract/Blockchain developer"

Testing the smart contract

  • Scroll down below and you should see some text that says "Deployed contract"
  • Expand the accordion and you should see two buttons. The "sendEth" function and "amount" variable we created.

Image description

  • Now go up to the account dropdown and switch to a new account(Seecond eth address).
  • Copy the account address by clicking on the copy icon beside it.

Image description

  • Change back to the account which you deployed your contract with. In my case, it was the first account.

NOTE: It is pertinent that you use the same Eth account that you used to deploy or else it won't work. Remember the require() that we added to the top of the **sendEth **function? Yo, you do.

  • Copy the account address (second address) and paste into the sendEth textfield.
  • On the "Value" dropdown change the 0 to any number of your choice and change the "wei" to "ether".
  • Scroll down and smash the sendEth button.

Bam!! You just sent ether to another eth address.

Check the other account where you copied the address and it should increment by the amount of ether you sent in.

Image description

Now switch the account to a new one and try sending some eth to it. You will encounter an error that says "Only the owner of the contract can send funds" (Its our handwork o.)

Image description
And there you have it, you were able to write a smart contract that can send ether to a different account and learnt the basics of solidity while at it.

You might be asking "Is it because of this 7 lines of code that you wrote this term paper of an article?"

Well, I assumed you had no prior knowledge of Solidity so I tried to explain every line of code to avoid any confusion.

You can follow me on GitHub I want to see what projects you are working on.

Sayonara...


[출처] https://dev.to/sparklesix/solidity-tutorial-how-to-build-and-deploy-a-smart-contract-to-send-ether-from-one-account-to-another-n54


암호화폐 (비트코인, cryptocurrency, bitcoin) Solidity 이더리움 Solidity Tutorial: How to build and deploy a smart contract to send Ether from one account to another

Solidity Tutorial: How to build and deploy a smart contract to send Ether from one account to another

Before we jump right in, I wrote an in-depth tutorial on how to deploy a smart contract to Rinkeby testnet, you can go read it up.

So let's goooo!!

경축! 아무것도 안하여 에스천사게임즈가 새로운 모습으로 재오픈 하였습니다.
어린이용이며, 설치가 필요없는 브라우저 게임입니다.
https://s1004games.com

Below are the table of contents.

Intro

What tools do we need?

Writing a smart contract.

Compiling and deploying to the JavaScript VM.

Testing the smart contract.

Intro

Oi, so here we going to be building a smart contract that can be able to send funds(ether) from one Ethereum account/address to another. Also, we will be adding a feature that allows only the owner(deployer) of the contract to be able to send these funds(ether).

What tools do we need?

The tools we will be needing for this tutorial is nothing other than the remix Ethereum web IDE for quick and rapid development and deployment of smart contracts written in Solidity.

You don't need to know anything about solidity or smart contracts in order to follow up with this tutorial as this is beginner friendly, and I try my best to explain every line of code as I write them.

Writing a smart contract

In order to get started, you have to jump over to this website known as Remix Ethereum. The below is a screenshot of the interface of a website you might get some annoying pop-ups so just hit the decline or accept button to get in.

Image description

  • Once we are here, head over to the left sidebar and locate the file icon. Click on it and it should pull up a makeshift file manager.
  • Locate the contract folder and click on it.

Image description

Just right above the contract folder you should see a file icon at the very top just beside the folder icon.

  • Click on it and it should generate a fresh file which you can name anything. But in this case, I'm going to name it sendEther.sol

Great, now let's get started with the good stuff.

Write the below on the first line of your solidity file.

// SPDX-License-Identifier: MIT

This tells the Solidity compiler that we are using the MIT license for this program.
SPDX means "Software Package Data Exchange" an open standard for software bill of materials.
SPDX allows the expression of components, licenses, copyrights, security references and other metadata relating to software.
You can read more about this here.

Next, let's define the version of Solidity we are going to use by writing the below.

pragma solidity ^0.8.11;

This tells the compiler that we are going to be using the 0.8.11 and above version of Solidity.
Ps: Solidity is a strongly typed compiled language so the semi colons are necessary.

Let's write a smart contract by using the Contract keyword like below.

contract SendEth{}

This is kind of the entry point where you can start writing out the functionalities, related state variables and logic of your contract. It's kind of conventional to capitalize the contract identifier. It can be any name you want, doesn't matter.

This smart contract is going to be needing two state variables named amount (for holding the amount to be sent) and the owner address.

Write the below inside your already defined contract body.

uint public amount;
address payable owner;

Solidity just like other languages have datatypes and uint is one of them. It actually means unsigned integer (no negatives say -20,nah we don't do that here)

Some other Solidity datatypes include bool, struct, mapping, string, address…

address payable owner;

Since we are sending ether from our Ethereum address we need to add the "payable" keyword right before our identifier.

Now, let's write the constructor just below our state variables.

constructor () {
     owner = payable(msg.sender); // set the deployer of contract as the owner
   }

The constructor allows us to define some logic to be set during the deployment of our smart contract. Let's say for example you want instantiate say a name variable during deployment, you do that in the constructor.

owner = payable(msg.sender);

Here, we are calling the owner address that we declared as a state variable and assigning it to msg.sender. Then we cast the msg.sender as a payable address.
msg.sender is kind of a global variable that you get access to in your contract and in this case, it holds the payable (can receive ether) address of the person who deployed the contract.

This might be confusing tho, I will clear the air once we get to the deployment stage so you can see it for yourself.

Your file right now should contain the below.

// SPDX-License-Identifier: MIT

pragma solidity ^0.8.11;

contract SendEth {
   uint public amount;
   address payable owner;
   constructor (){
     owner = payable(msg.sender); // set the deployer of contract as the owner
   }
}

Next, let's write a function to enable us send Ether to any address.

function sendEth(address payable receiver) payable public{
     }

Here we are declaring a function with name of sendEth **and a parameter of a **payable address. Any address sent in to this function should be able to receive funds (payable).
Also, since the function allows one to be able to send ether to another account we need to add the payable keyword to it.
The *public * keyword ensures that this function is able to seen and be called anywhere within the smart contract.

Now, add the below statement into the function body.

require(owner == msg.sender, "Only the owner can send funds");
amount = msg.value;
receiver.transfer(amount);

The first line ensures that only the owner of the contract who deployed it can be able to call this function. That means an outsider with a different Ethereum address can't send funds by calling this function.

amount = msg.value;

Here, we are setting the value the owner of the contract sent to the variable amount.

msg.value is another global variable that is available to you.

receiver.transfer(amount);

Then we send the ether to the address passed into the function as an argument using the transfer() function.

And that's it!! Your whole code should be like this below.


// SPDX-License-Identifier: MIT

pragma solidity ^0.8.11;

contract Sender {
   uint public amount;
   address payable owner;

   constructor (){
     owner = payable(msg.sender); // set the deployer of contract as the owner
   }
   function sendEth(address payable receiver) payable public{
     require(owner == msg.sender, "Only the owner can send funds");
     amount = msg.value;
     receiver.transfer(amount);
}
}

Now, it's time to deploy.
Go to the left of your sidebar and click on the solidity icon.
You should see the below.

Image description

If the compiler version is not on the version you wrote your contract in, you can change it here by switching to your preferred compiler.

  • Also, check the auto compile button so it auto compiles your code.
  • Click the "compile" button to compile it.

Deploying.

Cool, now we are going to deploy the contract on the JavaScript VM. This is a makeshift in-memory blockchain that remix avails us with.

  • Click the icon below the compile one and you should get the screen below.

Image description

Once here there are couple of things to do:

  • Leave the environment as JavaScript VM.
  • Select the eth account that you want to deploy the contract with. The first eth account is good enough.
  • Leave the gas fees and stuff as is.(Submit to the process)

Finally, click on the red deploy button.
If you see this green light in the console, then it was successful.

Image description

Phew!! You can beat your chest right now and change your Twitter bio to "Smart Contract/Blockchain developer"

Testing the smart contract

  • Scroll down below and you should see some text that says "Deployed contract"
  • Expand the accordion and you should see two buttons. The "sendEth" function and "amount" variable we created.

Image description

  • Now go up to the account dropdown and switch to a new account(Seecond eth address).
  • Copy the account address by clicking on the copy icon beside it.

Image description

  • Change back to the account which you deployed your contract with. In my case, it was the first account.

NOTE: It is pertinent that you use the same Eth account that you used to deploy or else it won't work. Remember the require() that we added to the top of the **sendEth **function? Yo, you do.

  • Copy the account address (second address) and paste into the sendEth textfield.
  • On the "Value" dropdown change the 0 to any number of your choice and change the "wei" to "ether".
  • Scroll down and smash the sendEth button.

Bam!! You just sent ether to another eth address.

Check the other account where you copied the address and it should increment by the amount of ether you sent in.

Image description

Now switch the account to a new one and try sending some eth to it. You will encounter an error that says "Only the owner of the contract can send funds" (Its our handwork o.)

Image description
And there you have it, you were able to write a smart contract that can send ether to a different account and learnt the basics of solidity while at it.

You might be asking "Is it because of this 7 lines of code that you wrote this term paper of an article?"

Well, I assumed you had no prior knowledge of Solidity so I tried to explain every line of code to avoid any confusion.

You can follow me on GitHub I want to see what projects you are working on.

Sayonara...


[출처] https://dev.to/sparklesix/solidity-tutorial-how-to-build-and-deploy-a-smart-contract-to-send-ether-from-one-account-to-another-n54


본 웹사이트는 광고를 포함하고 있습니다.
광고 클릭에서 발생하는 수익금은 모두 웹사이트 서버의 유지 및 관리, 그리고 기술 콘텐츠 향상을 위해 쓰여집니다.
번호 제목 글쓴이 날짜 조회 수
공지 오라클 기본 샘플 데이터베이스 졸리운_곰 2014.01.02 86136
공지 [SQL컨셉] 서적 "SQL컨셉"의 샘플 데이타 베이스 SAMPLE DATABASE of ORACLE 가을의 곰을... 2013.02.10 78637
공지 [G_SQL] Sample Database 가을의 곰을... 2012.05.20 95363
1084 [데이터분석][파이썬][python] 한글 글꼴 사용 (matplotlib) 졸리운_곰 2024.04.18 1360
1083 [암호화폐] 솔리디티를 이용해 이더리움 스마트 계약 시작하기 file 졸리운_곰 2024.04.05 1736
1082 암호화폐 (비트코인, cryptocurrency, bitcoin) 파이썬을 이용한 가상화폐 시세 분석 file 졸리운_곰 2024.03.28 1987
1081 [데이터베이스 모델링] 테이블정의양식 file 졸리운_곰 2024.02.23 1228
1080 [MYSQL] MYSQL JSON 관련 함수 file 졸리운_곰 2024.02.18 1358
1079 [통계 R 언어] R 언어에서 Python 코드 호출 : Calling Python from R 졸리운_곰 2024.01.28 1744
» 암호화폐 (비트코인, cryptocurrency, bitcoin) Solidity 이더리움 Solidity Tutorial: How to build and deploy a smart contract to send Ether from one account to another file 졸리운_곰 2024.01.23 1182
1077 암호화폐 (비트코인, cryptocurrency, bitcoin) Solidity 이더리움 Cheatsheet 졸리운_곰 2024.01.23 1761
1076 [데이터분석 & 데이터 사이언스] 데이터에 관한 꼭 알아야 할 오해와 진실 12가지 졸리운_곰 2024.01.17 1315
1075 [tensorflow 1.13 1.x 버전 설치법] [TensorFlow] Anaconda 가상환경 이용하여 TensorFlow GPU 설치 졸리운_곰 2024.01.08 1565
1074 [R lang 크롤링] 비트코인(암호화폐) 가격 불러오기 in R 졸리운_곰 2023.12.11 1245
1073 [통계 R 언어] 이동평균이 표시된 plotly 동적 주가 그래프 in R file 졸리운_곰 2023.12.11 1094
1072 [R lang 크롤링] 금융 데이터 분석 주가 데이터 가져오기 in R 졸리운_곰 2023.12.11 1286
1071 [R lang 크롤링] (R) [전략적가치투자] - 증액 투자법 file 졸리운_곰 2023.12.10 1102
1070 [R lang 크롤링] (R) [전략적가치투자] - 정액 투자법 file 졸리운_곰 2023.12.10 1636
1069 [R lang 크롤링] (R) [전략적가치투자] - 매입 보유법, 정률 투자법, 변율 투자법 file 졸리운_곰 2023.12.10 910
1068 [R lang 크롤링] (R) wordcloud2로 더 예쁘게 시각화하기 file 졸리운_곰 2023.12.10 1580
1067 [R lang 크롤링] (R) 나만의 주식차트만들기 / quantmod 패키지(2) file 졸리운_곰 2023.12.10 859
1066 [R lang 크롤링] (R) R에서 주가정보 가져오기 / quantmod 패키지(1) file 졸리운_곰 2023.12.10 1175
1065 [R lang 크롤링] (R) 정규식에서 사용되는 주요 기호들과 의미 file 졸리운_곰 2023.12.10 1522
대표 김성준 주소 : 경기 용인 분당수지 U타워 등록번호 : 142-07-27414
통신판매업 신고 : 제2012-용인수지-0185호 출판업 신고 : 수지구청 제 123호 개인정보보호최고책임자 : 김성준 sjkim70@stechstar.com
대표전화 : 010-4589-2193 [fax] 02-6280-1294 COPYRIGHT(C) stechstar.com ALL RIGHTS RESERVED