In this series, we'll be using Python, Flask and MySQL to create a simple web application from scratch. It will be a simple bucket list application where users can register, sign in and create their bucket list.
This tutorial assumes that you have some basic knowledge of the Python programming language. We'll be using Flask, a Python web application framework, to create our application, with MySQL as the back end.
If you need to brush up on your Python skills, try the Introduction to Python course, which gives you a solid foundation in the language for just 17072.
Introduction to Python Flask
Flask is a Python framework for creating web applications. From the official site,
Flask is a microframework for Python based on Werkzeug, Jinja 2 and good intentions.
When we think about Python, the de facto framework that comes to our mind is the Django framework. But from a Python beginner's perspective, Flask is easier to get started with, when compared to Django.
Setting Up Flask
Setting up Flask is pretty simple and quick. With pip package manager, all we need to do is:
1
pip install flask
Once you're done with installing Flask, create a folder called FlaskApp. Navigate to the FlaskApp folder and create a file called app.py. Import the flask module and create an app using Flask as shown:
1
2
fromflask importFlask
app =Flask(__name__)
Now define the basic route / and its corresponding request handler:
1
2
3
@app.route("/")
defmain():
return"Welcome!"
Next, check if the executed file is the main program and run the app:
First, when the application runs we should show a home page with the latest bucket list items added by users. So let's add our home page to our application folder.
Flask looks for template files inside the templates folder. So navigate to the PythonApp folder and create a folder called templates. Inside templates, create a file called index.html. Open up index.html and add the following HTML:
Open up app.py and import render_template, which we'll use to render the template files.
1
fromflask importFlask, render_template
Modify the main method to return the rendered template file.
1
2
defmain():
returnrender_template('index.html')
Save the changes and restart the server. Point your browser to http://localhost:5000/ and you should have the below screen:
Creating a Signup Page
Step 1: Setting Up the Database
We'll be using MySQL as the back end. So log into MySQL from the command line, or if you prefer a GUI like MySQL work bench, you can use that too. First, create a database called BucketList. From the command line:
1
mysql -u <username> -p
Enter the required password and when logged in, execute the following command to create the database:
1
CREATEDATABASEBucketList;
Once the database has been created, create a table called tbl_user as shown:
1
2
3
4
5
6
CREATETABLE`BucketList`.`tbl_user` (
`user_id` BIGINTNULLAUTO_INCREMENT,
`user_name` VARCHAR(45) NULL,
`user_username` VARCHAR(45) NULL,
`user_password` VARCHAR(45) NULL,
PRIMARYKEY(`user_id`));
We'll be using Stored procedures for our Python application to interact with the MySQL database. So, once the table tbl_user has been created, create a stored procedure called sp_createUser to sign up a user.
When creating a stored procedure to create a user in the tbl_user table, first we need to check if a user with the same username already exists. If it exists we need to throw an error to the user, otherwise we'll create the user in the user table. Here is how the stored procedure sp_createUser would look:
Also add the following CSS as signup.css to the static folder inside PythonApp.
01
02
03
04
05
06
07
08
09
10
11
12
13
14
15
16
17
18
19
20
21
22
23
24
25
26
27
28
29
30
31
32
33
34
35
36
37
38
39
body {
padding-top: 40px;
padding-bottom: 40px;
}
.form-signin {
max-width: 330px;
padding: 15px;
margin: 0auto;
}
.form-signin .form-signin-heading,
.form-signin .checkbox {
margin-bottom: 10px;
}
.form-signin .checkbox {
font-weight: normal;
}
.form-signin .form-control {
position: relative;
height: auto;
-webkit-box-sizing: border-box;
-moz-box-sizing: border-box;
box-sizing: border-box;
padding: 10px;
font-size: 16px;
}
.form-signin .form-control:focus {
z-index: 2;
}
.form-signin input[type="email"] {
margin-bottom: -1px;
border-bottom-right-radius: 0;
border-bottom-left-radius: 0;
}
.form-signin input[type="password"] {
margin-bottom: 10px;
border-top-left-radius: 0;
border-top-right-radius: 0;
}
In app.py add another method called showSignUp to render the signup page once a request comes to /showSignUp:
1
2
3
@app.route('/showSignUp')
defshowSignUp():
returnrender_template('signup.html')
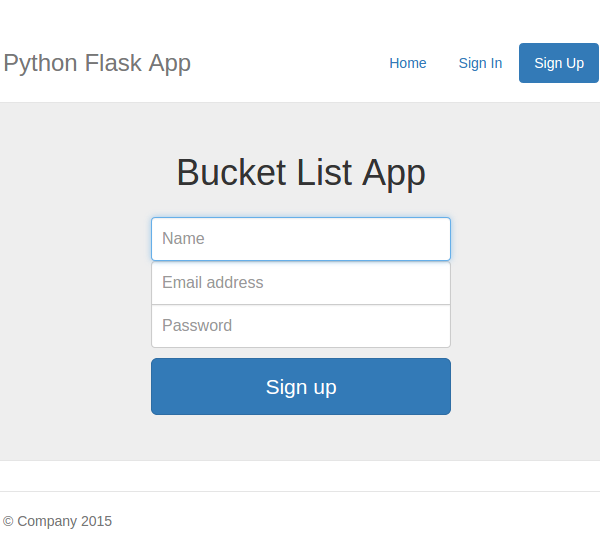
Save the changes and restart the server. Click on the Sign Up button on the home page and you should have the signup page as shown:
경축! 아무것도 안하여 에스천사게임즈가 새로운 모습으로 재오픈 하였습니다.
어린이용이며, 설치가 필요없는 브라우저 게임입니다. https://s1004games.com
Step 3: Implement a Signup method
Next, we need a server-side method for the UI to interact with the MySQL database. So navigate to PythonApp and open app.py. Create a new method called signUp and also add a route /signUp. Here is how it looks:
1
2
3
@app.route('/signUp')
defsignUp():
# create user code will be here !!
We'll be using jQuery AJAX to post our signup data to the signUp method, so we'll specify the method in the route definition.
1
2
3
@app.route('/signUp',methods=['POST'])
defsignUp():
# create user code will be here !!
In order to read the posted values we need to import request from Flask.
1
fromflask importFlask, render_template, request
Using request we can read the posted values as shown below:
1
2
3
4
5
6
7
@app.route('/signUp',methods=['POST'])
defsignUp():
# read the posted values from the UI
_name =request.form['inputName']
_email =request.form['inputEmail']
_password =request.form['inputPassword']
Once the values are read, we'll simply check if they are valid and for the time being let's just return a simple message:
01
02
03
04
05
06
07
08
09
10
11
12
13
@app.route('/signUp',methods=['POST'])
defsignUp():
# read the posted values from the UI
_name =request.form['inputName']
_email =request.form['inputEmail']
_password =request.form['inputPassword']
# validate the received values
if_name and_email and_password:
returnjson.dumps({'html':'<span>All fields good !!</span>'})
else:
returnjson.dumps({'html':'<span>Enter the required fields</span>'})
Also import json from Flask, since we are using it in the above code to return json data.
We'll be using jQuery AJAX to send the signup request to the Python method. Download and place jQuery inside PythonApp/static/js and add a link to it from the signup page. Once jQuery has been included, we'll add a jQuery POST request when the user clicks the Sign Up button.
So, let's attach the signup button click event as shown:
01
02
03
04
05
06
07
08
09
10
11
12
13
14
15
16
$(function() {
$('#btnSignUp').click(function() {
$.ajax({
url: '/signUp',
data: $('form').serialize(),
type: 'POST',
success: function(response) {
console.log(response);
},
error: function(error) {
console.log(error);
}
});
});
});
Save all the changes and restart the server. From the Sign Up page, fill in the details and click Sign Up. Check the browser console and you should have the below message:
1
{"html": "<span>All fields good !!</span>"}
Step 5: Call the MySQL Stored Procedure
Once we have the name, email address and password, we can simply call the MySQL stored procedure to create the new user.
To connect with MySQL, we'll be using Flask-MySQL, which is a Flask extension. In order to get started with Flask-MySQL, install it using pip package manager:
1
pip installflask-mysql
Import MySQL inside app.py:
1
fromflask.ext.mysql importMySQL
Earlier we defined our app as shown:
1
app =Flask(__name__)
Along with that include the following MySQL configurations:
1
2
3
4
5
6
7
8
mysql =MySQL()
# MySQL configurations
app.config['MYSQL_DATABASE_USER'] ='jay'
app.config['MYSQL_DATABASE_PASSWORD'] ='jay'
app.config['MYSQL_DATABASE_DB'] ='BucketList'
app.config['MYSQL_DATABASE_HOST'] ='localhost'
mysql.init_app(app)
First, let's create the MySQL connection:
1
conn =mysql.connect()
Once the connection is created, we'll require a cursor to query our stored procedure. So, using conn connection, create a cursor.
1
cursor =conn.cursor()
Before calling the create user stored procedure, let's make our password salted using a helper provided by Werkzeug. Import the module into app.py:
If the procedure is executed successfully, then we'll commit the changes and return the success message.
1
2
3
4
5
6
7
data =cursor.fetchall()
iflen(data) is0:
conn.commit()
returnjson.dumps({'message':'User created successfully !'})
else:
returnjson.dumps({'error':str(data[0])})
Save the changes and restart the server. Go to the signup page and enter the name, email address and password and click the Sign Up button. On successful user creation, you'll be able to see a message in your browser console.
1
{"message": "User created successfully !"}
Wrapping It Up
In this tutorial, we saw how to get started with creating a web application using Python Flask, MySQL and the Flask-MySQL extension. We created and designed the database tables and stored procedure, and implemented the signup functionality. In the next tutorial, we'll take this series to the next level by implementing sign-in functionality and some other features.
Source code from this tutorial is available on GitHub.
Do let us know your thoughts in the comments below!