
Use React and Spring Boot to Build a Simple CRUD App 기본적인 스프링부트와 React.js의 CRUD 기능 구현
2018.10.28 19:44
Use React and Spring Boot to Build a Simple CRUD App
기본적인 스프링부트와 React.js의 CRUD 기능 구현
Use React and Spring Boot to Build a Simple CRUD App

React was designed to make it painless to create interactive UIs. Its state management is efficient and only updates components when your data changes. Component logic is written in JavaScript, which means you can keep state out of the DOM and create components that are encapsulated.
Developers like CRUD (create, read, update, and delete) apps because they show a lot of the base functionality that you need when creating an app. Once you have the basics of CRUD completed in an app, most of the client-server plumbing is finished, and you can move on to implementing the necessary business logic.
Today, I’ll show you how to create a basic CRUD app with Spring Boot in React. You might remember a similar article I wrote for Angular last year: Build a Basic CRUD App with Angular 5.0 and Spring Boot 2.0. That tutorial uses OAuth 2.0’s implicit flow and our Okta Angular SDK. In this tutorial, I’ll be using the OAuth 2.0 Authorization Code flow and packaging the React app in the Spring Boot app for production. At the same time, I’ll show you how to keep React’s productive workflow for developing locally.
You will need Java 8, Node.js 8, and Yarn installed to complete this tutorial. You can use npm instead of Yarn, but you’ll need to translate the Yarn syntax to npm.
Create an API App with Spring Boot 2.0
I’m a frequent speaker at conferences and user groups around the world. My favorite user groups to speak at are Java User Groups (JUGs). I’ve been a Java developer for almost 20 years, and I love the Java community. One of my good friends, James Ward, said doing a JUG Tour was one of his favorite developer advocate activities back in the day. I recently took his advice and traded overseas conferences for JUG meetups in the US.
Why am I telling you this? Because I thought it’d be fun to create a “JUG Tours” app today that allows you to create/edit/delete JUGs, as well as view upcoming events.
To begin, navigate to start.spring.io and make the following selections:
- Group:
com.okta.developer - Artifact:
jugtours - Dependencies:
JPA,H2,Web,Lombok
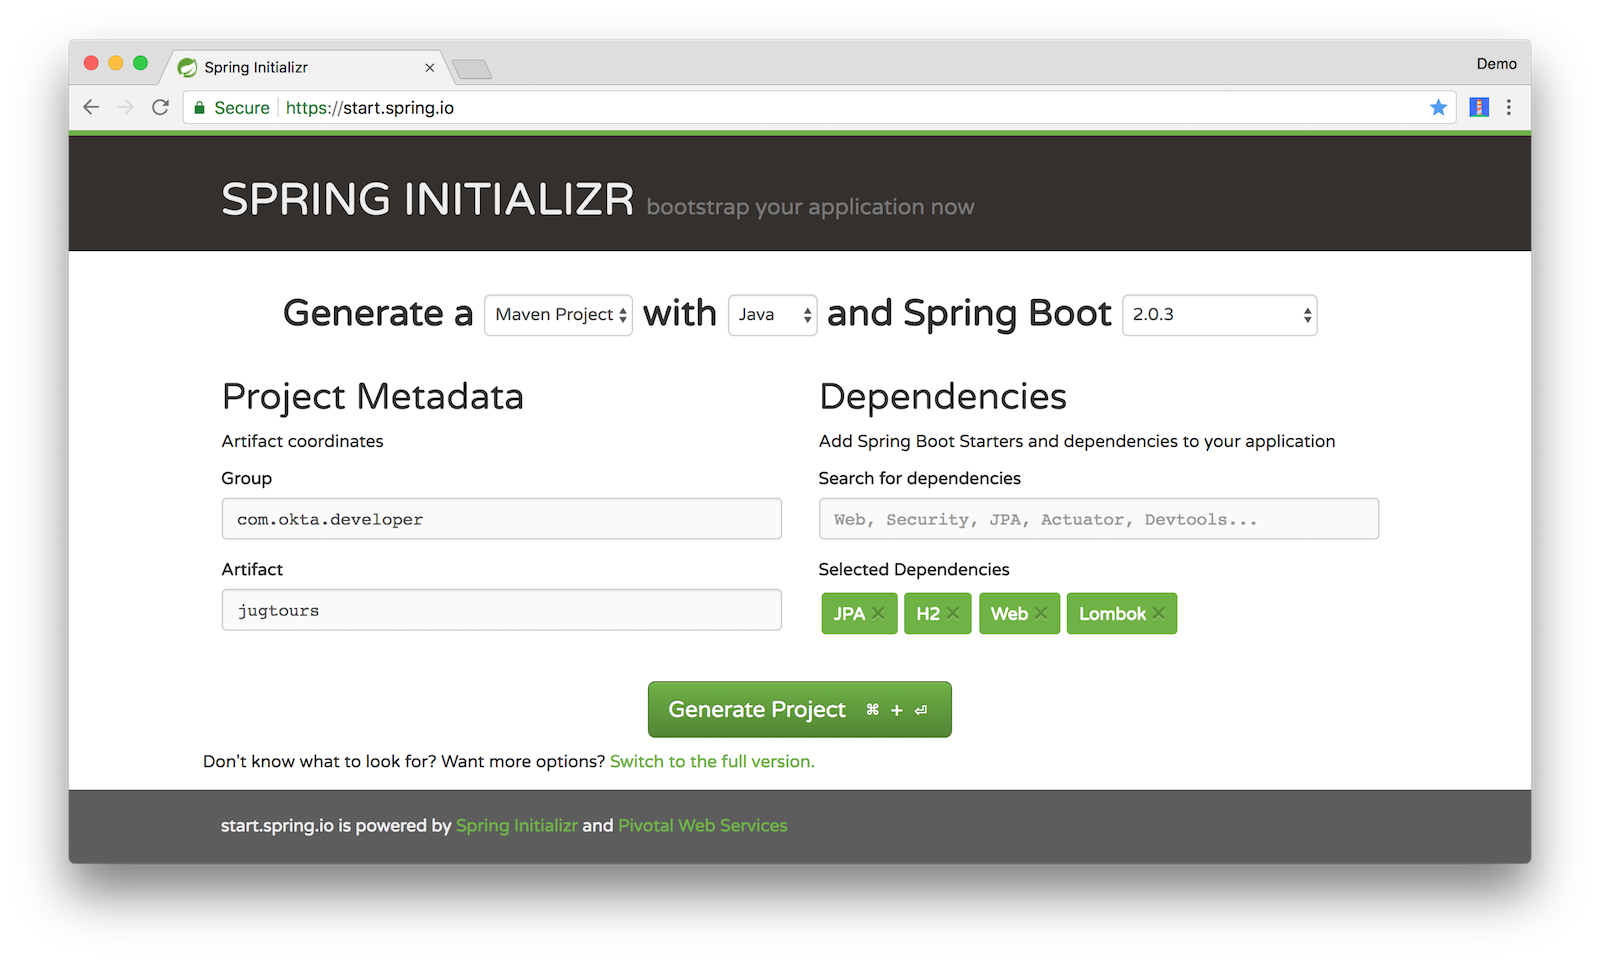
Click Generate Project, expand jugtours.zip after downloading, and open the project in your favorite IDE.
TIP: If you’re using IntelliJ IDEA or Spring Tool Suite, you can also use Spring Initializr when creating a new project.
Add a JPA Domain Model
The first thing you’ll need to do is to create a domain model that’ll hold your data. At a high level, there’s a Group that represents the JUG, an Event that has a many-to-one relationship with Group, and a User that has a one-to-many relationship with Group.
Create a src/main/java/com/okta/developer/jugtours/model directory and a Group.java class in it.
package com.okta.developer.jugtours.model;

import lombok.Data;
import lombok.NoArgsConstructor;
import lombok.NonNull;
import lombok.RequiredArgsConstructor;

import javax.persistence.*;
import java.util.Set;

@Data
@NoArgsConstructor
@RequiredArgsConstructor
@Entity
@Table(name = "user_group")
public class Group {

    @Id
    @GeneratedValue
    private Long id;
    @NonNull
    private String name;
    private String address;
    private String city;
    private String stateOrProvince;
    private String country;
    private String postalCode;
    @ManyToOne(cascade=CascadeType.PERSIST)
    private User user;

    @OneToMany(fetch = FetchType.EAGER, cascade=CascadeType.ALL)
    private Set<Event> events;
}
Create an Event.java class in the same package.
package com.okta.developer.jugtours.model;

import lombok.AllArgsConstructor;
import lombok.Builder;
import lombok.Data;
import lombok.NoArgsConstructor;

import javax.persistence.Entity;
import javax.persistence.GeneratedValue;
import javax.persistence.Id;
import javax.persistence.ManyToMany;
import java.time.Instant;
import java.util.Set;

@Data
@NoArgsConstructor
@AllArgsConstructor
@Builder
@Entity
public class Event {

    @Id
    @GeneratedValue
    private Long id;
    private Instant date;
    private String title;
    private String description;
    @ManyToMany
    private Set<User> attendees;
}
And, a User.java class.
package com.okta.developer.jugtours.model;

import lombok.AllArgsConstructor;
import lombok.Data;
import lombok.NoArgsConstructor;

import javax.persistence.Entity;
import javax.persistence.Id;

@Data
@NoArgsConstructor
@AllArgsConstructor
@Entity
public class User {

    @Id
    private String id;
    private String name;
    private String email;
}
Create a GroupRepository.java to manage the group entity.
package com.okta.developer.jugtours.model;

import org.springframework.data.jpa.repository.JpaRepository;

import java.util.List;

public interface GroupRepository extends JpaRepository<Group, Long> {
    Group findByName(String name);
}
To load some default data, create an Initializer.java class in the com.okta.developer.jugtours package.
package com.okta.developer.jugtours;

import com.okta.developer.jugtours.model.Event;
import com.okta.developer.jugtours.model.Group;
import com.okta.developer.jugtours.model.GroupRepository;
import org.springframework.boot.CommandLineRunner;
import org.springframework.stereotype.Component;

import java.time.Instant;
import java.util.Collections;
import java.util.stream.Stream;

@Component
class Initializer implements CommandLineRunner {

    private final GroupRepository repository;

    public Initializer(GroupRepository repository) {
        this.repository = repository;
    }

    @Override
    public void run(String... strings) {
        Stream.of("Denver JUG", "Utah JUG", "Seattle JUG",
                "Richmond JUG").forEach(name ->
                repository.save(new Group(name))
        );

        Group djug = repository.findByName("Denver JUG");
        Event e = Event.builder().title("Full Stack Reactive")
                .description("Reactive with Spring Boot + React")
                .date(Instant.parse("2018-12-12T18:00:00.000Z"))
                .build();
        djug.setEvents(Collections.singleton(e));
        repository.save(djug);

        repository.findAll().forEach(System.out::println);
    }
}
TIP: If your IDE has issues with Event.builder(), it means that you need to turn on annotation processing and/or install the Lombok plugin. I had to uninstall/reinstall the Lombok plugin in IntelliJ IDEA to get things to work.
If you start your app (using ./mvnw spring-boot:run) after adding this code, you’ll see the list of groups and events displayed in your console.
Group(id=1, name=Denver JUG, address=null, city=null, stateOrProvince=null, country=null, postalCode=null, user=null, events=[Event(id=5, date=2018-12-12T18:00:00Z, title=Full Stack Reactive, description=Reactive with Spring Boot + React, attendees=[])])
Group(id=2, name=Utah JUG, address=null, city=null, stateOrProvince=null, country=null, postalCode=null, user=null, events=[])
Group(id=3, name=Seattle JUG, address=null, city=null, stateOrProvince=null, country=null, postalCode=null, user=null, events=[])
Group(id=4, name=Richmond JUG, address=null, city=null, stateOrProvince=null, country=null, postalCode=null, user=null, events=[])
Add a GroupController.java class (in src/main/java/.../jugtours/web/GroupController.java) that allows you to CRUD groups.
package com.okta.developer.jugtours.web;

import com.okta.developer.jugtours.model.Group;
import com.okta.developer.jugtours.model.GroupRepository;
import org.slf4j.Logger;
import org.slf4j.LoggerFactory;
import org.springframework.http.HttpStatus;
import org.springframework.http.ResponseEntity;
import org.springframework.web.bind.annotation.*;

import javax.validation.Valid;
import java.net.URI;
import java.net.URISyntaxException;
import java.util.Collection;
import java.util.Optional;

@RestController
@RequestMapping("/api")
class GroupController {

    private final Logger log = LoggerFactory.getLogger(GroupController.class);
    private GroupRepository groupRepository;

    public GroupController(GroupRepository groupRepository) {
        this.groupRepository = groupRepository;
    }

    @GetMapping("/groups")
    Collection<Group> groups() {
        return groupRepository.findAll();
    }

    @GetMapping("/group/{id}")
    ResponseEntity<?> getGroup(@PathVariable Long id) {
        Optional<Group> group = groupRepository.findById(id);
        return group.map(response -> ResponseEntity.ok().body(response))
                .orElse(new ResponseEntity<>(HttpStatus.NOT_FOUND));
    }

    @PostMapping("/group")
    ResponseEntity<Group> createGroup(@Valid @RequestBody Group group) throws URISyntaxException {
        log.info("Request to create group: {}", group);
        Group result = groupRepository.save(group);
        return ResponseEntity.created(new URI("/api/group/" + result.getId()))
                .body(result);
    }

    @PutMapping("/group/{id}")
    ResponseEntity<Group> updateGroup(@PathVariable Long id, @Valid @RequestBody Group group) {
        group.setId(id);
        log.info("Request to update group: {}", group);
        Group result = groupRepository.save(group);
        return ResponseEntity.ok().body(result);
    }

    @DeleteMapping("/group/{id}")
    public ResponseEntity<?> deleteGroup(@PathVariable Long id) {
        log.info("Request to delete group: {}", id);
        groupRepository.deleteById(id);
        return ResponseEntity.ok().build();
    }
}
If you restart your server app and hit http://localhost:8080/api/groups with your browser, or a command line client, you should see the list of groups.
You can create, read, update, and delete groups with the following HTTPie commands.
http POST :8080/api/group name='Dublin JUG' city=Dublin country=Ireland
http :8080/api/group/6
http PUT :8080/api/group/6 name='Dublin JUG' city=Dublin country=Ireland address=Downtown
http DELETE :8080/api/group/6
Create a React UI with Create React App
Create React App is a command line utility that generates React projects for you. It’s a convenient tool because it also offers commands that will build and optimize your project for production. It uses webpack under the covers for building. If you want to learn more about webpack, I recommend webpack.academy.
Create a new project in the jugtours directory with Yarn.
yarn create react-app app
After the app creation process completes, navigate into the app directory and install Bootstrap, cookie support for React, React Router, and Reactstrap.
cd app
yarn add bootstrap@4.1.2 react-cookie@2.2.0 react-router-dom@4.3.1 reactstrap@6.3.0
You’ll use Bootstrap’s CSS and Reactstrap’s components to make the UI look better, especially on mobile phones. If you’d like to learn more about Reactstrap, see https://reactstrap.github.io. It has extensive documentation on its various components and how to use them.
Add Bootstrap’s CSS file as an import in app/src/index.js.
import 'bootstrap/dist/css/bootstrap.min.css';
Call Your Spring Boot API and Display the Results
Modify app/src/App.js to use the following code that calls /api/groups and display the list in the UI.
import React, { Component } from 'react';
import logo from './logo.svg';
import './App.css';

class App extends Component {
  state = {
    isLoading: true,
    groups: []
  };

  async componentDidMount() {
    const response = await fetch('/api/groups');
    const body = await response.json();
    this.setState({ groups: body, isLoading: false });
  }

  render() {
    const {groups, isLoading} = this.state;

    if (isLoading) {
      return <p>Loading...</p>;
    }

    return (
      <div className="App">
        <header className="App-header">
          <img src={logo} className="App-logo" alt="logo" />
          <h1 className="App-title">Welcome to React</h1>
        </header>
        <div className="App-intro">
          <h2>JUG List</h2>
          {groups.map(group =>
            <div key={group.id}>
              {group.name}
            </div>
          )}
        </div>
      </div>
    );
  }
}

export default App;
To proxy from /api to http://localhost:8080/api, add a proxy setting to app/package.json.
"scripts": {...},
"proxy": "http://localhost:8080"
To learn more about this feature, search for “proxy” in app/README.md. Create React App ships with all kinds of documentation in this file, how cool is that?!
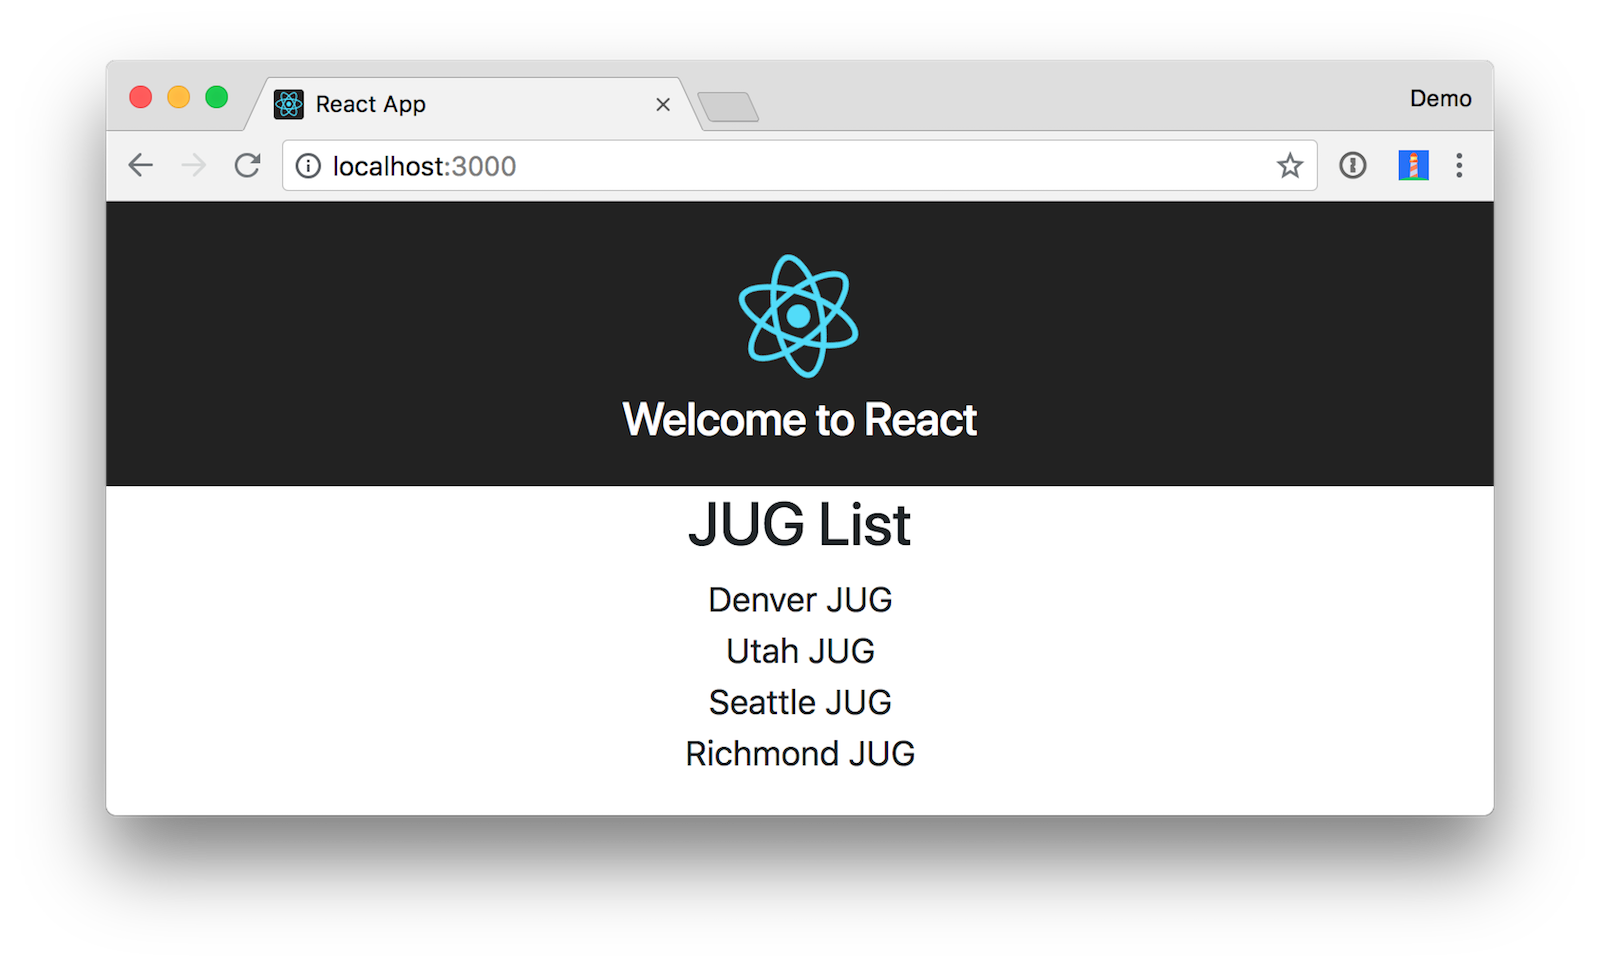
Make sure Spring Boot is running, then run yarn start in your app directory. You should see the list of default groups.
Build a React GroupList Component
React is all about components, and you don’t want to render everything in your main App, so create app/src/GroupList.jsand populate it with the following JavaScript.
import React, { Component } from 'react';
import { Button, ButtonGroup, Container, Table } from 'reactstrap';
import AppNavbar from './AppNavbar';
import { Link } from 'react-router-dom';

class GroupList extends Component {

  constructor(props) {
    super(props);
    this.state = {groups: [], isLoading: true};
    this.remove = this.remove.bind(this);
  }

  componentDidMount() {
    this.setState({isLoading: true});

    fetch('api/groups')
      .then(response => response.json())
      .then(data => this.setState({groups: data, isLoading: false}));
  }

  async remove(id) {
    await fetch(`/api/group/${id}`, {
      method: 'DELETE',
      headers: {
        'Accept': 'application/json',
        'Content-Type': 'application/json'
      }
    }).then(() => {
      let updatedGroups = [...this.state.groups].filter(i => i.id !== id);
      this.setState({groups: updatedGroups});
    });
  }

  render() {
    const {groups, isLoading} = this.state;

    if (isLoading) {
      return <p>Loading...</p>;
    }

    const groupList = groups.map(group => {
      const address = `${group.address || ''} ${group.city || ''} ${group.stateOrProvince || ''}`;
      return <tr key={group.id}>
        <td style={{whiteSpace: 'nowrap'}}>{group.name}</td>
        <td>{address}</td>
        <td>{group.events.map(event => {
          return <div key={event.id}>{new Intl.DateTimeFormat('en-US', {
            year: 'numeric',
            month: 'long',
            day: '2-digit'
          }).format(new Date(event.date))}: {event.title}</div>
        })}</td>
        <td>
          <ButtonGroup>
            <Button size="sm" color="primary" tag={Link} to={"/groups/" + group.id}>Edit</Button>
            <Button size="sm" color="danger" onClick={() => this.remove(group.id)}>Delete</Button>
          </ButtonGroup>
        </td>
      </tr>
    });

    return (
      <div>
        <AppNavbar/>
        <Container fluid>
          <div className="float-right">
            <Button color="success" tag={Link} to="/groups/new">Add Group</Button>
          </div>
          <h3>My JUG Tour</h3>
          <Table className="mt-4">
            <thead>
            <tr>
              <th width="20%">Name</th>
              <th width="20%">Location</th>
              <th>Events</th>
              <th width="10%">Actions</th>
            </tr>
            </thead>
            <tbody>
            {groupList}
            </tbody>
          </Table>
        </Container>
      </div>
    );
  }
}

export default GroupList;
Create AppNavbar.js in the same directory to establish a common UI feature between components.
import React, { Component } from 'react';
import { Collapse, Nav, Navbar, NavbarBrand, NavbarToggler, NavItem, NavLink } from 'reactstrap';
import { Link } from 'react-router-dom';

export default class AppNavbar extends Component {
  constructor(props) {
    super(props);
    this.state = {isOpen: false};
    this.toggle = this.toggle.bind(this);
  }

  toggle() {
    this.setState({
      isOpen: !this.state.isOpen
    });
  }

  render() {
    return <Navbar color="dark" dark expand="md">
      <NavbarBrand tag={Link} to="/">Home</NavbarBrand>
      <NavbarToggler onClick={this.toggle}/>
      <Collapse isOpen={this.state.isOpen} navbar>
        <Nav className="ml-auto" navbar>
          <NavItem>
            <NavLink
              href="https://twitter.com/oktadev">@oktadev</NavLink>
          </NavItem>
          <NavItem>
            <NavLink href="https://github.com/oktadeveloper/okta-spring-boot-react-crud-example">GitHub</NavLink>
          </NavItem>
        </Nav>
      </Collapse>
    </Navbar>;
  }
}
Create app/src/Home.js to serve as the landing page for your app.
import React, { Component } from 'react';
import './App.css';
import AppNavbar from './AppNavbar';
import { Link } from 'react-router-dom';
import { Button, Container } from 'reactstrap';

class Home extends Component {
  render() {
    return (
      <div>
        <AppNavbar/>
        <Container fluid>
          <Button color="link"><Link to="/groups">Manage JUG Tour</Link></Button>
        </Container>
      </div>
    );
  }
}

export default Home;
Also, change app/src/App.js to use React Router to navigate between components.
import React, { Component } from 'react';
import './App.css';
import Home from './Home';
import { BrowserRouter as Router, Route, Switch } from 'react-router-dom';
import GroupList from './GroupList';

class App extends Component {
  render() {
    return (
      <Router>
        <Switch>
          <Route path='/' exact={true} component={Home}/>
          <Route path='/groups' exact={true} component={GroupList}/>
        </Switch>
      </Router>
    )
  }
}

export default App;
To make your UI a bit more spacious, add a top margin to Bootrap’s container classes in app/src/App.css.
.container, .container-fluid {
  margin-top: 20px
}
Your React app should update itself as you make changes and you should see a screen like the following at http://localhost:3000.
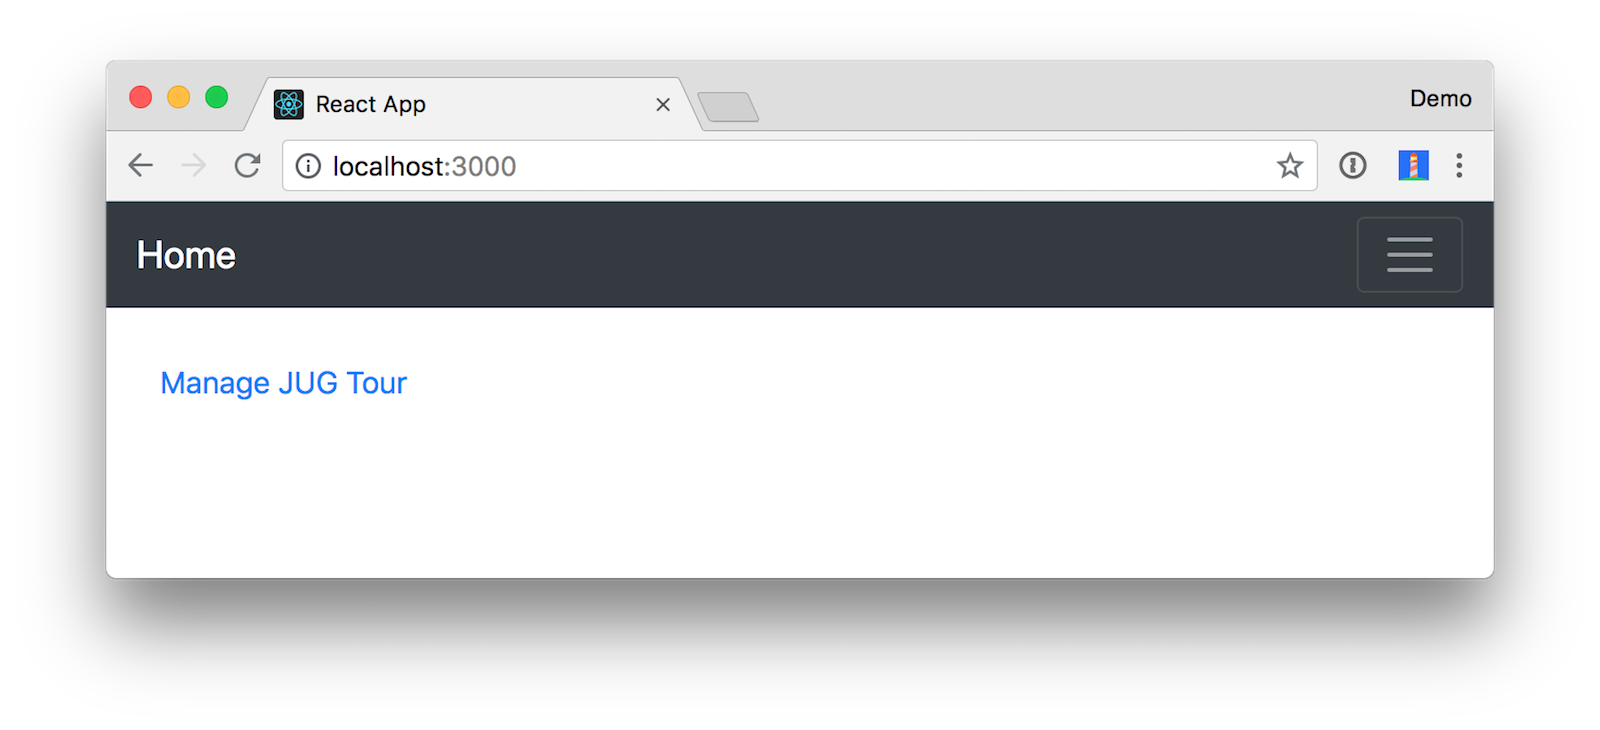
Click on Manage JUG Tour and you should see a list of the default groups.
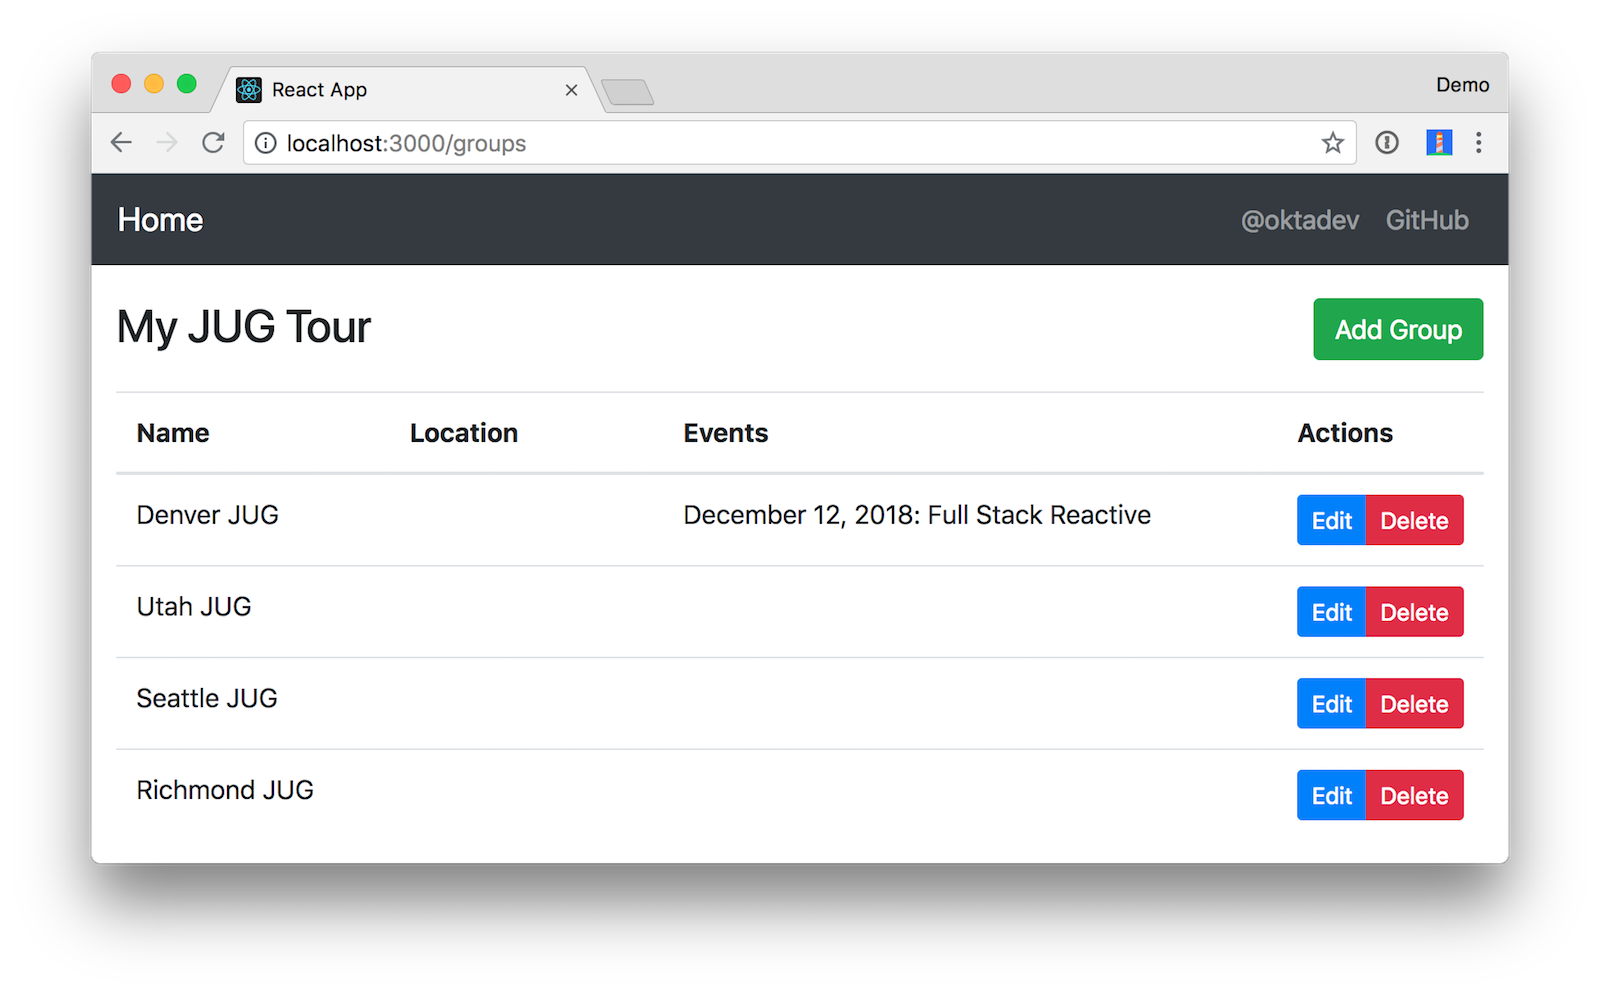
It’s great that you can see your Spring Boot API’s data in your React app, but it’s no fun if you can’t edit it!
Add a React GroupEdit Component
Create app/src/GroupEdit.js and use its componentDidMount() to fetch the group resource with the ID from the URL.
import React, { Component } from 'react';
import { Link, withRouter } from 'react-router-dom';
import { Button, Container, Form, FormGroup, Input, Label } from 'reactstrap';
import AppNavbar from './AppNavbar';

class GroupEdit extends Component {

  emptyItem = {
    name: '',
    address: '',
    city: '',
    stateOrProvince: '',
    country: '',
    postalCode: ''
  };

  constructor(props) {
    super(props);
    this.state = {
      item: this.emptyItem
    };
    this.handleChange = this.handleChange.bind(this);
    this.handleSubmit = this.handleSubmit.bind(this);
  }

  async componentDidMount() {
    if (this.props.match.params.id !== 'new') {
      const group = await (await fetch(`/api/group/${this.props.match.params.id}`)).json();
      this.setState({item: group});
    }
  }

  handleChange(event) {
    const target = event.target;
    const value = target.value;
    const name = target.name;
    let item = {...this.state.item};
    item[name] = value;
    this.setState({item});
  }

  async handleSubmit(event) {
    event.preventDefault();
    const {item} = this.state;

    await fetch('/api/group', {
      method: (item.id) ? 'PUT' : 'POST',
      headers: {
        'Accept': 'application/json',
        'Content-Type': 'application/json'
      },
      body: JSON.stringify(item),
    });
    this.props.history.push('/groups');
  }

  render() {
    const {item} = this.state;
    const title = <h2>{item.id ? 'Edit Group' : 'Add Group'}</h2>;

    return <div>
      <AppNavbar/>
      <Container>
        {title}
        <Form onSubmit={this.handleSubmit}>
          <FormGroup>
            <Label for="name">Name</Label>
            <Input type="text" name="name" id="name" value={item.name || ''}
                   onChange={this.handleChange} autoComplete="name"/>
          </FormGroup>
          <FormGroup>
            <Label for="address">Address</Label>
            <Input type="text" name="address" id="address" value={item.address || ''}
                   onChange={this.handleChange} autoComplete="address-level1"/>
          </FormGroup>
          <FormGroup>
            <Label for="city">City</Label>
            <Input type="text" name="city" id="city" value={item.city || ''}
                   onChange={this.handleChange} autoComplete="address-level1"/>
          </FormGroup>
          <div className="row">
            <FormGroup className="col-md-4 mb-3">
              <Label for="stateOrProvince">State/Province</Label>
              <Input type="text" name="stateOrProvince" id="stateOrProvince" value={item.stateOrProvince || ''}
                     onChange={this.handleChange} autoComplete="address-level1"/>
            </FormGroup>
            <FormGroup className="col-md-5 mb-3">
              <Label for="country">Country</Label>
              <Input type="text" name="country" id="country" value={item.country || ''}
                     onChange={this.handleChange} autoComplete="address-level1"/>
            </FormGroup>
            <FormGroup className="col-md-3 mb-3">
              <Label for="country">Postal Code</Label>
              <Input type="text" name="postalCode" id="postalCode" value={item.postalCode || ''}
                     onChange={this.handleChange} autoComplete="address-level1"/>
            </FormGroup>
          </div>
          <FormGroup>
            <Button color="primary" type="submit">Save</Button>{' '}
            <Button color="secondary" tag={Link} to="/groups">Cancel</Button>
          </FormGroup>
        </Form>
      </Container>
    </div>
  }
}

export default withRouter(GroupEdit);
The withRouter() higher-order component is needed at the bottom to expose this.props.history so you can navigate back to the GroupList after adding or saving a group.


Modify app/src/App.js to import GroupEdit and specify a path to it.
import GroupEdit from './GroupEdit';

class App extends Component {
  render() {
    return (
      <Router>
        <Switch>
          ...
          <Route path='/groups/:id' component={GroupEdit}/>
        </Switch>
      </Router>
    )
  }
}
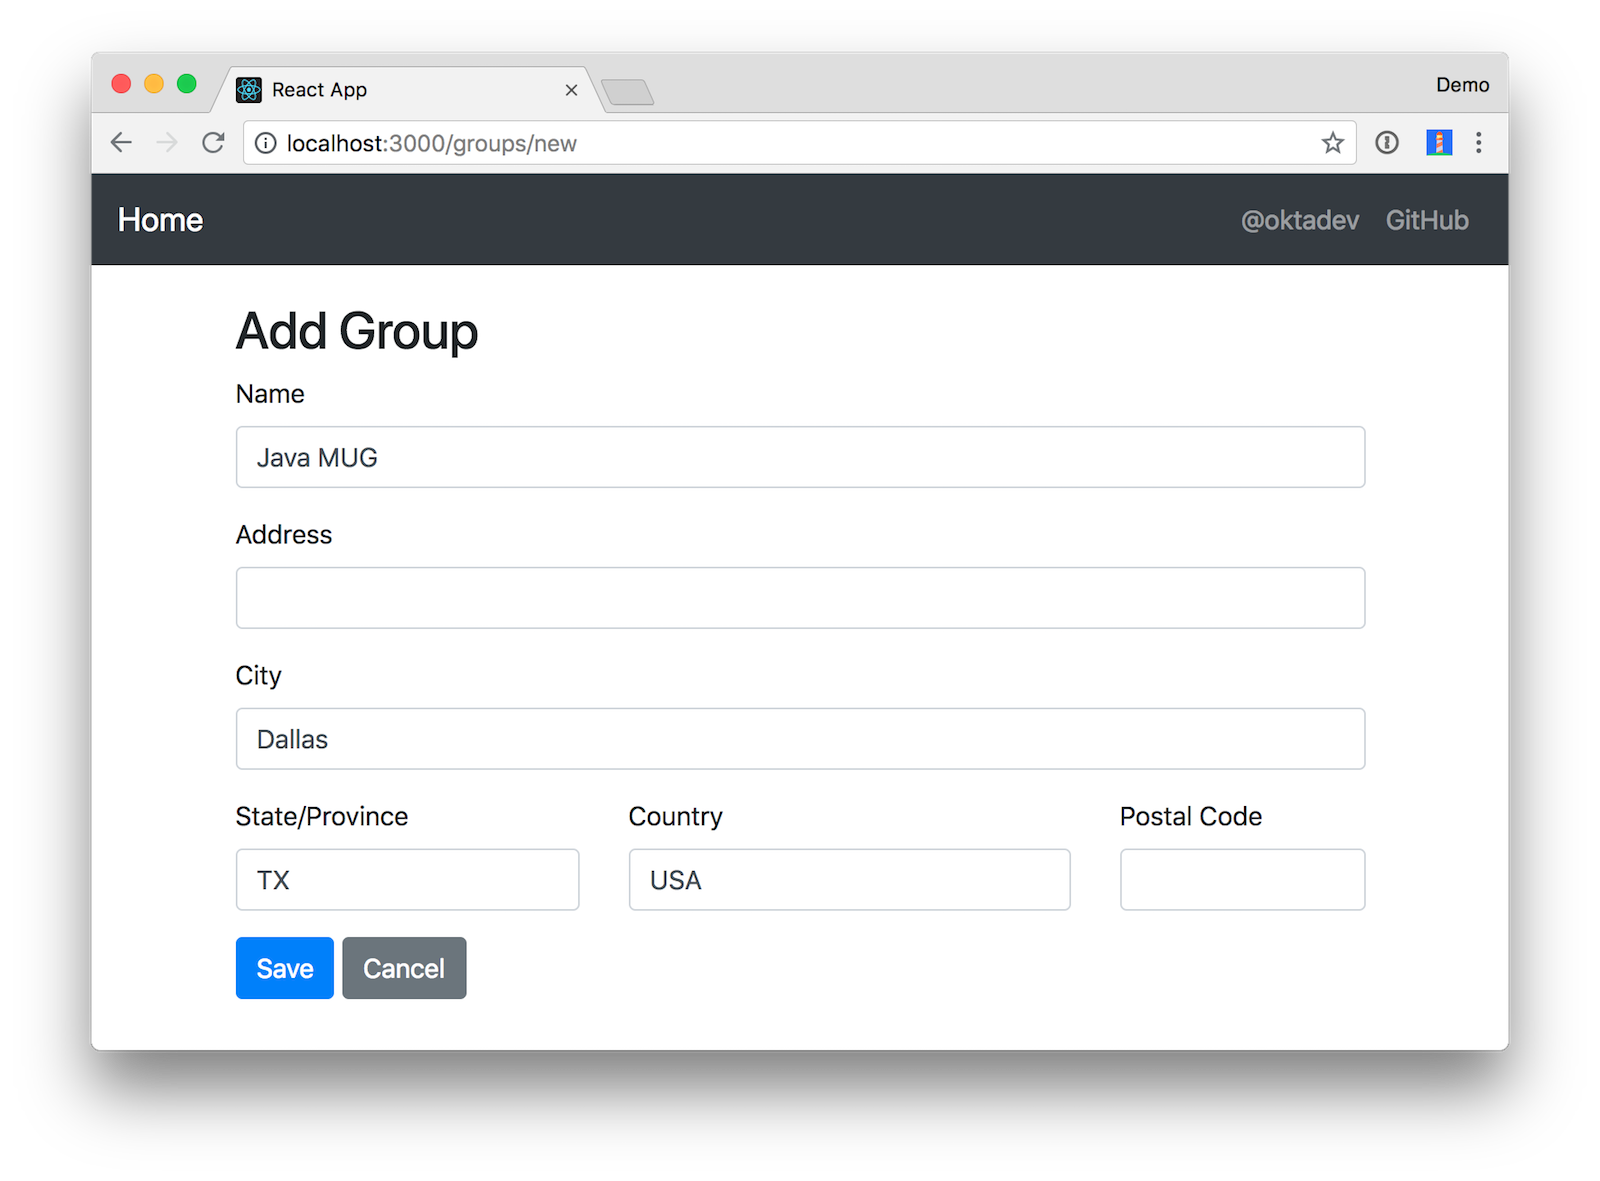
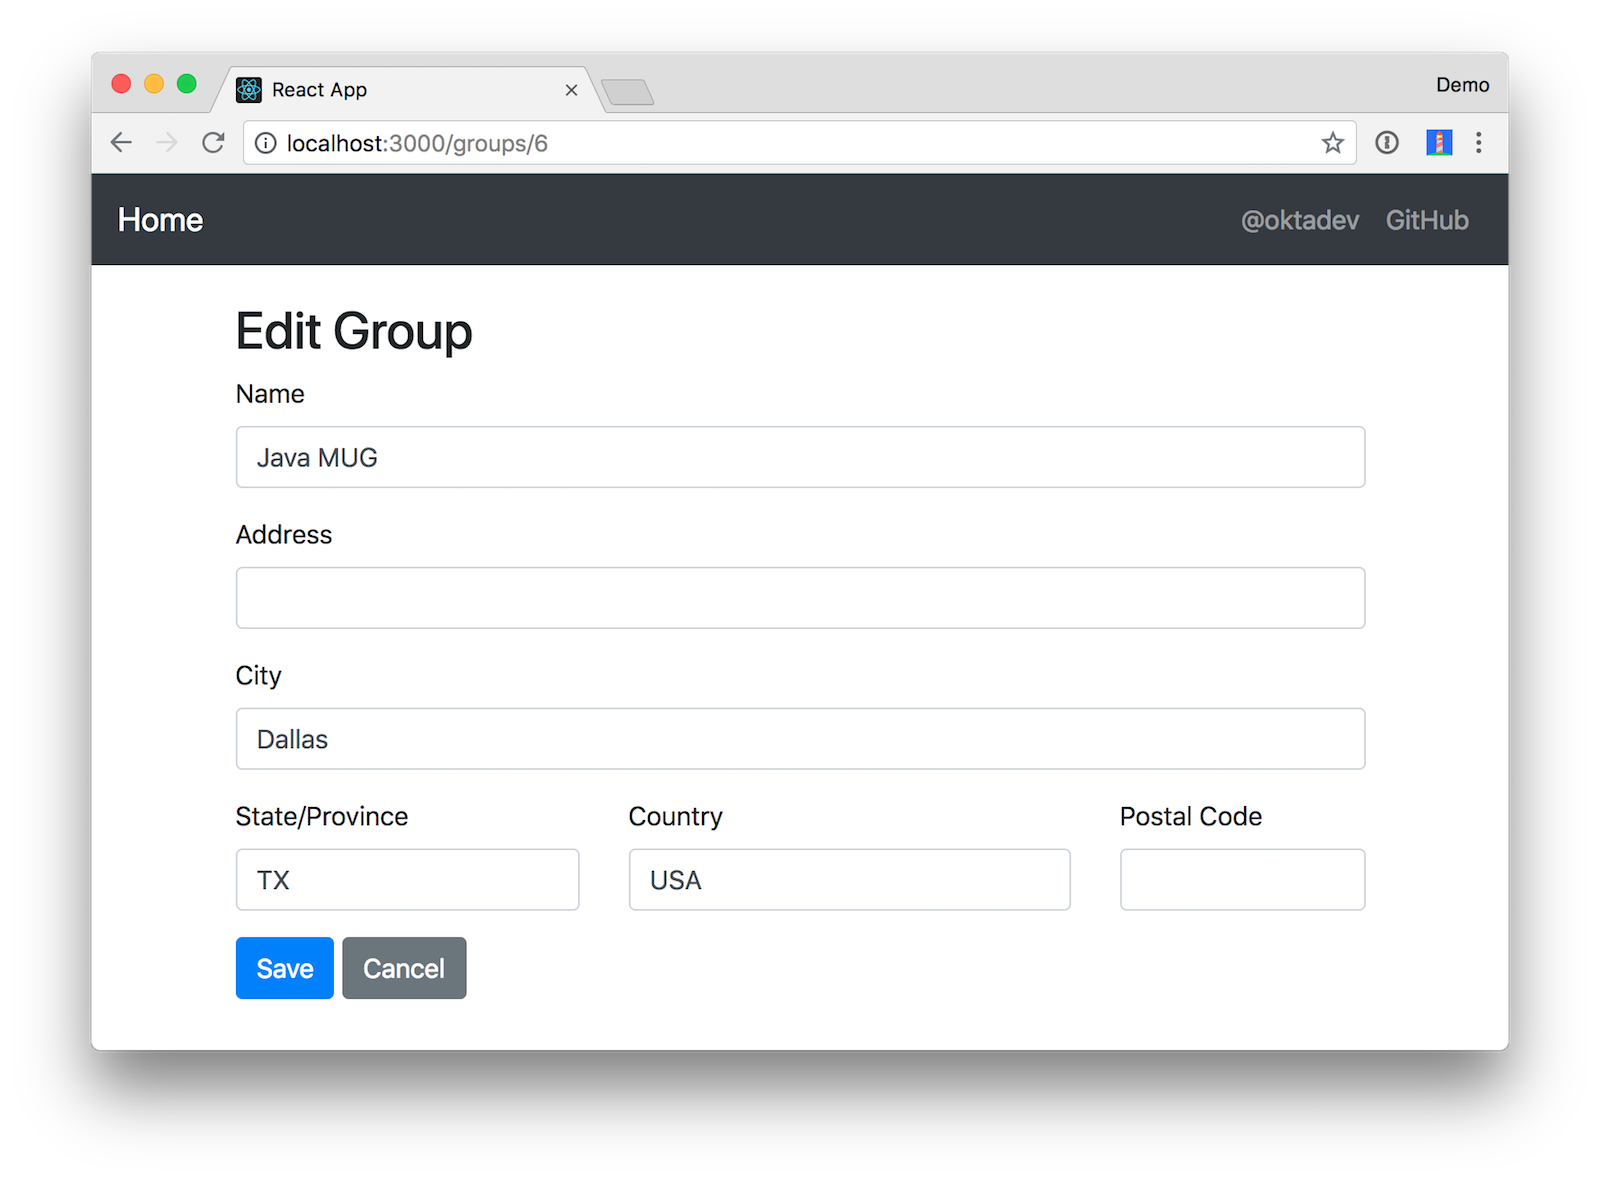
Now you should be able to add and edit groups!
Add Authentication with Okta
It’s pretty cool to build a CRUD app, but it’s even cooler to build a secure one. To achieve that, you’ll want to add authentication so users have to log in before viewing/modifying groups. To make this simple, you can use Okta’s API for OIDC. At Okta, our goal is to make identity management a lot easier, more secure, and more scalable than what you’re used to. Okta is a cloud service that allows developers to create, edit, and securely store user accounts and user account data, and connect them with one or multiple applications. Our API enables you to:
- Authenticate and authorize your users
- Store data about your users
- Perform password-based and social login
- Secure your application with multi-factor authentication
- And much more! Check out our product documentation
Are you sold? Register for a forever-free developer account, and when you’re done, come on back so you can learn more about building secure apps with Spring Boot!
Spring Security + OIDC
Spring Security added OIDC support in its 5.0 release. Since then, they’ve made quite a few improvements and simplified its required configuration. I figured it’d be fun to explore the latest and greatest, so I started by updating pom.xml with Spring’s lib-snapshot repositories, upgrading Spring Boot to 2.1 M1 (which includes Spring Security 5.1 M2), and adding the necessary Spring Security dependencies to do OIDC authentication.
<?xml version="1.0" encoding="UTF-8"?>
<project>
    ...
    <parent>
        <groupId>org.springframework.boot</groupId>
        <artifactId>spring-boot-starter-parent</artifactId>
        <version>2.1.0.M1</version>
        <relativePath/> <!-- lookup parent from repository -->
    </parent>

    <dependencies>
        ...
        <dependency>
            <groupId>org.springframework.boot</groupId>
            <artifactId>spring-boot-starter-security</artifactId>
        </dependency>
        <dependency>
            <groupId>org.springframework.security</groupId>
            <artifactId>spring-security-config</artifactId>
        </dependency>
        <dependency>
            <groupId>org.springframework.security</groupId>
            <artifactId>spring-security-oauth2-client</artifactId>
        </dependency>
        <dependency>
            <groupId>org.springframework.security</groupId>
            <artifactId>spring-security-oauth2-jose</artifactId>
        </dependency>
    </dependencies>

    <build...>

    <pluginRepositories>
        <pluginRepository>
            <id>spring-snapshots</id>
            <name>Spring Snapshots</name>
            <url>https://repo.spring.io/libs-snapshot</url>
            <snapshots>
                <enabled>true</enabled>
            </snapshots>
        </pluginRepository>
    </pluginRepositories>
    <repositories>
        <repository>
            <id>spring-snapshots</id>
            <name>Spring Snapshot</name>
            <url>https://repo.spring.io/libs-snapshot</url>
        </repository>
    </repositories>
</project>
Create an OIDC App in Okta
Log in to your Okta Developer account (or sign up if you don’t have an account) and navigate to Applications > Add Application. Click Web and click Next. Give the app a name you’ll remember, and specify http://localhost:8080/login/oauth2/code/oktaas a Login redirect URI. Click Done, then click Edit to edit General Settings. Add http://localhost:3000 and http://localhost:8080 as Logout redirect URIs, then click Save.
Copy and paste the URI of your default authorization server, client ID, and the client secret into src/main/resources/application.yml. Create this file, and you can delete the application.properties file in the same directory.
spring:
  security:
    oauth2:
      client:
        registration:
          okta:
            client-id: {clientId}
            client-secret: {clientSecret}
            scope: openid email profile
        provider:
          okta:
            issuer-uri: https://{yourOktaDomain}/oauth2/default
Configure Spring Security for React and User Identity
To make Spring Security React-friendly, create a SecurityConfiguration.java file in src/main/java/.../jugtours/config. Create the config directory and put this class in it.
package com.okta.developer.jugtours.config;

import org.springframework.context.annotation.Bean;
import org.springframework.context.annotation.Configuration;
import org.springframework.context.annotation.Profile;
import org.springframework.security.config.annotation.web.builders.HttpSecurity;
import org.springframework.security.config.annotation.web.configuration.WebSecurityConfigurerAdapter;
import org.springframework.security.web.csrf.CookieCsrfTokenRepository;
import org.springframework.security.web.savedrequest.HttpSessionRequestCache;
import org.springframework.security.web.savedrequest.RequestCache;
import org.springframework.security.web.savedrequest.SimpleSavedRequest;

import javax.servlet.http.HttpServletRequest;
import javax.servlet.http.HttpServletResponse;

@Configuration
public class SecurityConfiguration extends WebSecurityConfigurerAdapter {

    @Override
    protected void configure(HttpSecurity http) throws Exception {
        http
            .oauth2Login().and()
            .csrf()
                .csrfTokenRepository(CookieCsrfTokenRepository.withHttpOnlyFalse())
                .and()
            .authorizeRequests()
                .antMatchers("/**/*.{js,html,css}").permitAll()
                .antMatchers("/", "/api/user").permitAll()
                .anyRequest().authenticated();
    }

    @Bean
    @Profile("dev")
    public RequestCache refererRequestCache() {
        return new HttpSessionRequestCache() {
            @Override
            public void saveRequest(HttpServletRequest request, HttpServletResponse response) {
                String referrer = request.getHeader("referer");
                if (referrer != null) {
                    request.getSession().setAttribute("SPRING_SECURITY_SAVED_REQUEST", new SimpleSavedRequest(referrer));
                }
            }
        };
    }
}
This class has a lot going on, so let me explain a few things. The RequestCache bean overrides the default request cache. It saves the referrer header (misspelled referer in real life), so Spring Security can redirect back to it after authentication. The referrer-based request cache comes in handy when you’re developing React on http://localhost:3000 and want to be redirected back there after logging in. This bean is only activated in development, because it’s not necessary in production when everything is running on the same port.
@Bean
@Profile("dev")
public RequestCache refererRequestCache() {
    return new HttpSessionRequestCache() {
        @Override
        public void saveRequest(HttpServletRequest request, HttpServletResponse response) {
            String referrer = request.getHeader("referer");
            if (referrer != null) {
                request.getSession().setAttribute("SPRING_SECURITY_SAVED_REQUEST", new SimpleSavedRequest(referrer));
            }
        }
    };
}
Configuring CSRF (cross site request forgery) protection with CookieCsrfTokenRepository.withHttpOnlyFalse() means that the XSRF-TOKEN cookie won’t be marked HTTP-only, so React can read it and send it back when it tries to manipulate data.
The antMatchers lines define what URLs are allowed for anonymous users. You will soon configure things so your React app is served up by your Spring Boot app, hence the reason for allowing web files and “/”. You might notice there’s an exposed /api/user path too. Create src/main/java/.../jugtours/web/UserController.java and populate it with the following code. This API will be used by React to 1) find out if a user is authenticated, and 2) perform global logout.
package com.okta.developer.jugtours.web;

import org.springframework.beans.factory.annotation.Value;
import org.springframework.http.HttpStatus;
import org.springframework.http.ResponseEntity;
import org.springframework.security.core.annotation.AuthenticationPrincipal;
import org.springframework.security.oauth2.core.oidc.OidcIdToken;
import org.springframework.security.oauth2.core.user.OAuth2User;
import org.springframework.web.bind.annotation.GetMapping;
import org.springframework.web.bind.annotation.PostMapping;
import org.springframework.web.bind.annotation.RestController;

import javax.servlet.http.HttpServletRequest;
import java.util.HashMap;
import java.util.Map;

@RestController
public class UserController {

    @Value("${spring.security.oauth2.client.provider.okta.issuer-uri}")
    String issuerUri;

    @GetMapping("/api/user")
    public ResponseEntity<?> getUser(@AuthenticationPrincipal OAuth2User user) {
        if (user == null) {
            return new ResponseEntity<>("", HttpStatus.OK);
        } else {
            return ResponseEntity.ok().body(user.getAttributes());
        }
    }

    @PostMapping("/api/logout")
    public ResponseEntity<?> logout(HttpServletRequest request,
                                    @AuthenticationPrincipal(expression = "idToken") OidcIdToken idToken) {
        // send logout URL to client so they can initiate logout - doesn't work from the server side
        // Make it easier: https://github.com/spring-projects/spring-security/issues/5540
        String logoutUrl = issuerUri + "/v1/logout";

        Map<String, String> logoutDetails = new HashMap<>();
        logoutDetails.put("logoutUrl", logoutUrl);
        logoutDetails.put("idToken", idToken.getTokenValue());
        request.getSession(false).invalidate();
        return ResponseEntity.ok().body(logoutDetails);
    }
}
You’ll also want to add user information when creating groups so that you can filter by your JUG tour. Add a UserRepository.java in the same directory as GroupRepository.java.
package com.okta.developer.jugtours.model;

import org.springframework.data.jpa.repository.JpaRepository;

public interface UserRepository extends JpaRepository<User, String> {
}
Add a new findAllByUserId(String id) method to GroupRepository.java.
List<Group> findAllByUserId(String id);
Then inject UserRepository into GroupController.java and use it to create (or grab an existing user) when adding a new group. While you’re there, modify the groups() method to filter by user.
package com.okta.developer.jugtours.web;

import com.okta.developer.jugtours.model.Group;
import com.okta.developer.jugtours.model.GroupRepository;
import com.okta.developer.jugtours.model.User;
import com.okta.developer.jugtours.model.UserRepository;
import org.slf4j.Logger;
import org.slf4j.LoggerFactory;
import org.springframework.http.HttpStatus;
import org.springframework.http.ResponseEntity;
import org.springframework.security.core.annotation.AuthenticationPrincipal;
import org.springframework.security.oauth2.core.user.OAuth2User;
import org.springframework.web.bind.annotation.*;

import javax.validation.Valid;
import java.net.URI;
import java.net.URISyntaxException;
import java.security.Principal;
import java.util.Collection;
import java.util.Map;
import java.util.Optional;

@RestController
@RequestMapping("/api")
class GroupController {

    private final Logger log = LoggerFactory.getLogger(GroupController.class);
    private GroupRepository groupRepository;
    private UserRepository userRepository;

    public GroupController(GroupRepository groupRepository, UserRepository userRepository) {
        this.groupRepository = groupRepository;
        this.userRepository = userRepository;
    }

    @GetMapping("/groups")
    Collection<Group> groups(Principal principal) {
        return groupRepository.findAllByUserId(principal.getName());
    }

    @GetMapping("/group/{id}")
    ResponseEntity<?> getGroup(@PathVariable Long id) {
        Optional<Group> group = groupRepository.findById(id);
        return group.map(response -> ResponseEntity.ok().body(response))
                .orElse(new ResponseEntity<>(HttpStatus.NOT_FOUND));
    }

    @PostMapping("/group")
    ResponseEntity<Group> createGroup(@Valid @RequestBody Group group,
                                      @AuthenticationPrincipal OAuth2User principal) throws URISyntaxException {
        log.info("Request to create group: {}", group);
        Map<String, Object> details = principal.getAttributes();
        String userId = details.get("sub").toString();

        // check to see if user already exists
        Optional<User> user = userRepository.findById(userId);
        group.setUser(user.orElse(new User(userId,
                        details.get("name").toString(), details.get("email").toString())));

        Group result = groupRepository.save(group);
        return ResponseEntity.created(new URI("/api/group/" + result.getId()))
                .body(result);
    }

    @PutMapping("/group")
    ResponseEntity<Group> updateGroup(@Valid @RequestBody Group group) {
        log.info("Request to update group: {}", group);
        Group result = groupRepository.save(group);
        return ResponseEntity.ok().body(result);
    }

    @DeleteMapping("/group/{id}")
    public ResponseEntity<?> deleteGroup(@PathVariable Long id) {
        log.info("Request to delete group: {}", id);
        groupRepository.deleteById(id);
        return ResponseEntity.ok().build();
    }
}
To magnify the changes, they’re in the groups() and createGroup() methods. It’s pretty slick that Spring JPA will create the findAllByUserId() method/query for you and userRepository.findById() uses Java 8’s Optional.
@GetMapping("/groups")
Collection<Group> groups(Principal principal) {
    return groupRepository.findAllByUserId(principal.getName());
}

@PostMapping("/group")
ResponseEntity<Group> createGroup(@Valid @RequestBody Group group,
                                  @AuthenticationPrincipal OAuth2User principal) throws URISyntaxException {
    log.info("Request to create group: {}", group);
    Map<String, Object> details = principal.getAttributes();
    String userId = details.get("sub").toString();

    // check to see if user already exists
    Optional<User> user = userRepository.findById(userId);
    group.setUser(user.orElse(new User(userId,
                    details.get("name").toString(), details.get("email").toString())));

    Group result = groupRepository.save(group);
    return ResponseEntity.created(new URI("/api/group/" + result.getId()))
            .body(result);
}
Modify React Handle CSRF and be Identity Aware
You’ll need to make a few changes to your React components to make them identity-aware. The first thing you’ll want to do is modify App.js to wrap everything in a CookieProvider. This component allows you to read the CSRF cookie and send it back as a header.
import { CookiesProvider } from 'react-cookie';

class App extends Component {
  render() {
    return (
      <CookiesProvider>
        <Router...>
      </CookiesProvider>
    )
  }
}
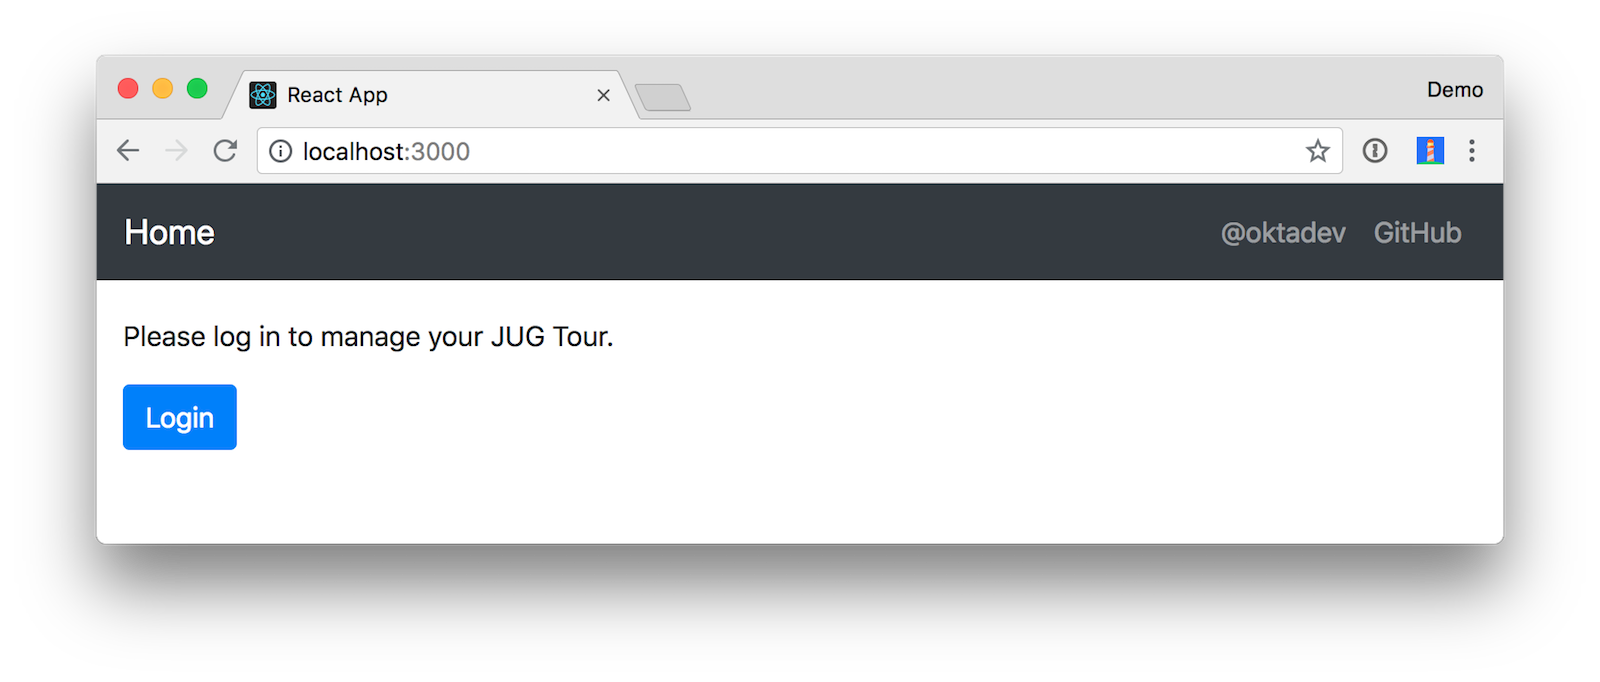
Modify app/src/Home.js to call /api/user to see if the user is logged in. If they’re not, show a Login button.
import React, { Component } from 'react';
import './App.css';
import AppNavbar from './AppNavbar';
import { Link } from 'react-router-dom';
import { Button, Container } from 'reactstrap';
import { withCookies } from 'react-cookie';

class Home extends Component {
  state = {
    isLoading: true,
    isAuthenticated: false,
    user: undefined
  };

  constructor(props) {
    super(props);
    const {cookies} = props;
    this.state.csrfToken = cookies.get('XSRF-TOKEN');
    this.login = this.login.bind(this);
    this.logout = this.logout.bind(this);
  }

  async componentDidMount() {
    const response = await fetch('/api/user', {credentials: 'include'});
    const body = await response.text();
    if (body === '') {
      this.setState(({isAuthenticated: false}))
    } else {
      this.setState({isAuthenticated: true, user: JSON.parse(body)})
    }
  }

  login() {
    let port = (window.location.port ? ':' + window.location.port : '');
    if (port === ':3000') {
      port = ':8080';
    }
    window.location.href = '//' + window.location.hostname + port + '/private';
  }

  logout() {
    console.log('logging out...');
    fetch('/api/logout', {method: 'POST', credentials: 'include',
      headers: {'X-XSRF-TOKEN': this.state.csrfToken}}).then(res => res.json())
      .then(response => {
        window.location.href = response.logoutUrl + "?id_token_hint=" +
          response.idToken + "&post_logout_redirect_uri=" + window.location.origin;
      });
  }

  render() {
    const message = this.state.user ?
      <h2>Welcome, {this.state.user.name}!</h2> :
      <p>Please log in to manage your JUG Tour.</p>;

    const button = this.state.isAuthenticated ?
      <div>
        <Button color="link"><Link to="/groups">Manage JUG Tour</Link></Button>
        <br/>
        <Button color="link" onClick={this.logout}>Logout</Button>
      </div> :
      <Button color="primary" onClick={this.login}>Login</Button>;

    return (
      <div>
        <AppNavbar/>
        <Container fluid>
          {message}
          {button}
        </Container>
      </div>
    );
  }
}

export default withCookies(Home);
There are some things you should be aware of in this component:
withCookies()wraps theHomecomponent at the bottom to give it access to cookies. Then you can useconst {cookies} = propsin the constructor, and fetch a cookie withcookies.get('XSRF-TOKEN').- When using
fetch(), you need to include{credentials: 'include'}to transfer cookies. You will get a 403 Forbidden if you do not include this option. - The CSRF cookie from Spring Security has a different name than the header you need to send back. The cookie name is
XSRF-TOKEN, while the header name isX-XSRF-TOKEN.
Update app/src/GroupList.js to have similar changes. The good news is you don’t need to make any changes to the render() method.
import { Link, withRouter } from 'react-router-dom';
import { instanceOf } from 'prop-types';
import { withCookies, Cookies } from 'react-cookie';

class GroupList extends Component {
  static propTypes = {
    cookies: instanceOf(Cookies).isRequired
  };

  constructor(props) {
    super(props);
    const {cookies} = props;
    this.state = {groups: [], csrfToken: cookies.get('XSRF-TOKEN'), isLoading: true};
    this.remove = this.remove.bind(this);
  }

  componentDidMount() {
    this.setState({isLoading: true});

    fetch('api/groups', {credentials: 'include'})
      .then(response => response.json())
      .then(data => this.setState({groups: data, isLoading: false}))
      .catch(() => this.props.history.push('/'))
  }

  async remove(id) {
    await fetch(`/api/group/${id}`, {
      method: 'DELETE',
      headers: {
        'X-XSRF-TOKEN': this.state.csrfToken,
        'Accept': 'application/json',
        'Content-Type': 'application/json'
      },
      credentials: 'include'
    }).then(() => {
        let updatedGroups = [...this.state.groups].filter(i => i.id !== id);
        this.setState({groups: updatedGroups});
      });
  }

  render() {...}
}

export default withCookies(withRouter(GroupList));
Update GroupEdit.js too.
import { instanceOf } from 'prop-types';
import { Cookies, withCookies } from 'react-cookie';

class GroupEdit extends Component {
  static propTypes = {
    cookies: instanceOf(Cookies).isRequired
  };

  emptyItem = {
    name: '',
    address: '',
    city: '',
    stateOrProvince: '',
    country: '',
    postalCode: ''
  };

  constructor(props) {
    super(props);
    const {cookies} = props;
    this.state = {
      item: this.emptyItem,
      csrfToken: cookies.get('XSRF-TOKEN')
    };
    this.handleChange = this.handleChange.bind(this);
    this.handleSubmit = this.handleSubmit.bind(this);
  }

  async componentDidMount() {
    if (this.props.match.params.id !== 'new') {
      try {
        const group = await (await fetch(`/api/group/${this.props.match.params.id}`, {credentials: 'include'})).json();
        this.setState({item: group});
      } catch (error) {
        this.props.history.push('/');
      }
    }
  }

  handleChange(event) {
    const target = event.target;
    const value = target.value;
    const name = target.name;
    let item = {...this.state.item};
    item[name] = value;
    this.setState({item});
  }

  async handleSubmit(event) {
    event.preventDefault();
    const {item, csrfToken} = this.state;

    await fetch('/api/group', {
      method: (item.id) ? 'PUT' : 'POST',
      headers: {
        'X-XSRF-TOKEN': csrfToken,
        'Accept': 'application/json',
        'Content-Type': 'application/json'
      },
      body: JSON.stringify(item),
      credentials: 'include'
    });
    this.props.history.push('/groups');
  }

  render() {...}
}

export default withCookies(withRouter(GroupEdit));
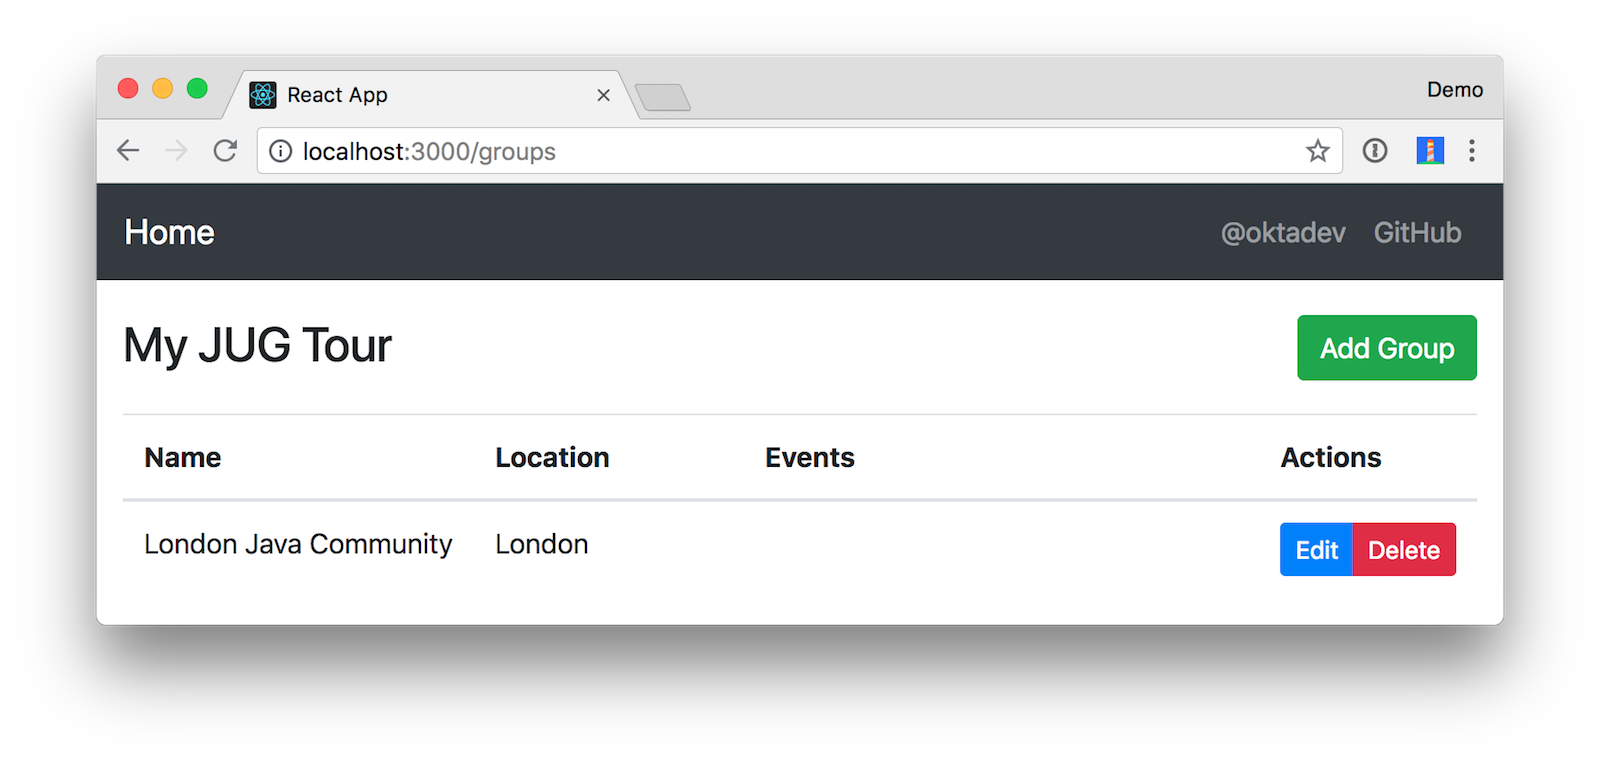
After all these changes, you should be able to restart both Spring Boot and React and witness the glory of planning your very own JUG Tour!
Configure Maven to Build and Package React with Spring Boot
To build and package your React app with Maven, you can use the frontend-maven-plugin and Maven’s profiles to activate it. Add properties for versions, and a <profiles> section to your pom.xml.
<properties>
    ...
    <frontend-maven-plugin.version>1.6</frontend-maven-plugin.version>
    <node.version>v10.6.0</node.version>
    <yarn.version>v1.8.0</yarn.version>
</properties>

<profiles>
    <profile>
        <id>dev</id>
        <activation>
            <activeByDefault>true</activeByDefault>
        </activation>
        <properties>
            <spring.profiles.active>dev</spring.profiles.active>
        </properties>
    </profile>
    <profile>
        <id>prod</id>
        <build>
            <plugins>
                <plugin>
                    <artifactId>maven-resources-plugin</artifactId>
                    <executions>
                        <execution>
                            <id>copy-resources</id>
                            <phase>process-classes</phase>
                            <goals>
                                <goal>copy-resources</goal>
                            </goals>
                            <configuration>
                                <outputDirectory>${basedir}/target/classes/static</outputDirectory>
                                <resources>
                                    <resource>
                                        <directory>app/build</directory>
                                    </resource>
                                </resources>
                            </configuration>
                        </execution>
                    </executions>
                </plugin>
                <plugin>
                    <groupId>com.github.eirslett</groupId>
                    <artifactId>frontend-maven-plugin</artifactId>
                    <version>${frontend-maven-plugin.version}</version>
                    <configuration>
                        <workingDirectory>app</workingDirectory>
                    </configuration>
                    <executions>
                        <execution>
                            <id>install node</id>
                            <goals>
                                <goal>install-node-and-yarn</goal>
                            </goals>
                            <configuration>
                                <nodeVersion>${node.version}</nodeVersion>
                                <yarnVersion>${yarn.version}</yarnVersion>
                            </configuration>
                        </execution>
                        <execution>
                            <id>yarn install</id>
                            <goals>
                                <goal>yarn</goal>
                            </goals>
                            <phase>generate-resources</phase>
                        </execution>
                        <execution>
                            <id>yarn test</id>
                            <goals>
                                <goal>yarn</goal>
                            </goals>
                            <phase>test</phase>
                            <configuration>
                                <arguments>test</arguments>
                            </configuration>
                        </execution>
                        <execution>
                            <id>yarn build</id>
                            <goals>
                                <goal>yarn</goal>
                            </goals>
                            <phase>compile</phase>
                            <configuration>
                                <arguments>build</arguments>
                            </configuration>
                        </execution>
                    </executions>
                </plugin>
            </plugins>
        </build>
        <properties>
            <spring.profiles.active>prod</spring.profiles.active>
        </properties>
    </profile>
</profiles>
While you’re at it, add the active profile setting to src/main/resources/application.yml:
spring:
  profiles:
    active: @spring.profiles.active@
  security:
After adding this, you should be able to run ./mvnw spring-boot:run -Pprod and your app see your app running on http://localhost:8080.
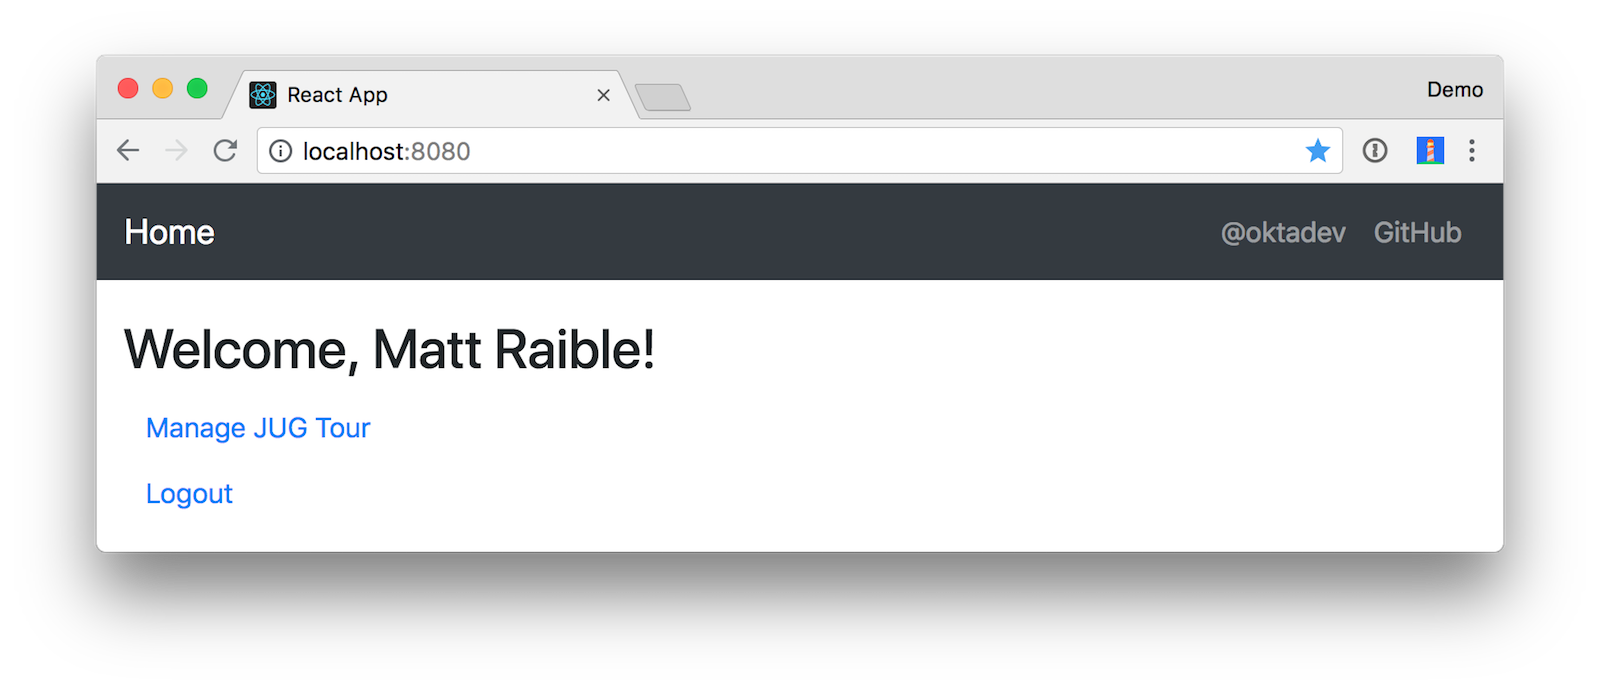
NOTE: If you see a blank page when you try to login, it’s caused by the cache-first service worker in React. If you’re using Chrome, you can workaround it by opening Developer Tools > Application > Service Workers and checking Bypass for network.
This isn’t a great solution because users of your app will need to do this.
I’ve discovered two options to fix this problem (so far):
- Disable PWA support in your app by removing
registerServiceWorker()fromclient/src/index.js- Eject the webpack configuration and configure
/privateto be a network-first URL
Spring Security’s OAuth 2.0 vs. OIDC Support
While working on this post, I collaborated with Rob Winch (Spring Security Lead) to make sure I used Spring Security efficiently. I started out using Spring Security’s OAuth 2.0 support and its @EnableOAuth2Sso annotation. Rob encouraged me to use Spring Security’s OIDC support instead and was instrumental in making everything work.
As milestones and releases of Spring Boot 2.1 and Spring Security 5.1 are released, I’ll update this post to remove code that’s no longer necessary.
Learn More about Spring Boot and React
I hope you’ve enjoyed this tutorial on how to do CRUD with React, Spring Boot, and Spring Security. You can see that Spring Security’s OIDC support is pretty robust, and doesn’t require a whole lot of configuration. Adding CSRF protection and packaging your Spring Boot + React app as a single artifact is pretty cool too!
You can find the example created in this tutorial on GitHub at https://github.com/oktadeveloper/okta-spring-boot-react-crud-example.
We’ve written some other cool Spring Boot and React tutorials, check them out if you’re interested.
- Bootiful Development with Spring Boot and React
- Build a React Native Application and Authenticate with OAuth 2.0
- Add CI/CD to Your Spring Boot App with Jenkins X and Kubernetes
- Build a React Application with User Authentication in 15 Minutes
If you have any questions, please don’t hesitate to leave a comment below, or ask us on our Okta Developer Forums. Follow us on Twitter if you want to see more tutorials like this one!
Changelog:
- Jul 31, 2018: Updated to use Spring Boot 2.1.0 M1 and Spring Security 5.1.0 M2. You can see the example app changes in okta-spring-boot-react-crud-example#6; changes to this post can be viewed in okta.github.io#2222.
[출처] https://developer.okta.com/blog/2018/07/19/simple-crud-react-and-spring-boot
광고 클릭에서 발생하는 수익금은 모두 웹사이트 서버의 유지 및 관리, 그리고 기술 콘텐츠 향상을 위해 쓰여집니다.
